Modifying the All American SUN OVEN®
Making it work better
[click photos for details]
 Most of the mods below would also apply to the original SUN OVEN®, but the new and slightly improved All American is what I have. The SUN OVEN® was first sold in 1986 and has changed little since. They are common, over-priced, but they work, so those interested in solar cooking are likely to have or get one. Buying a new one is an option, but used ones may turn up. For the somewhat DIY enabled, making a solar slow cooker that will work as well or better is doable.
An alternative are the cheaper reflector panel cookers that surround the pot. To be effective you just need a black pot that will fit inside a glass bowl having a tight fitting glass lid that serves as a marginally insulated “oven.” This may seem crude, but it works. You won't be cooking any turkeys this way, but turkey meat in a pot is cookable. Just putting a black pot inside a plastic oven bag works too, so solar cooking on a modest investment is doable.
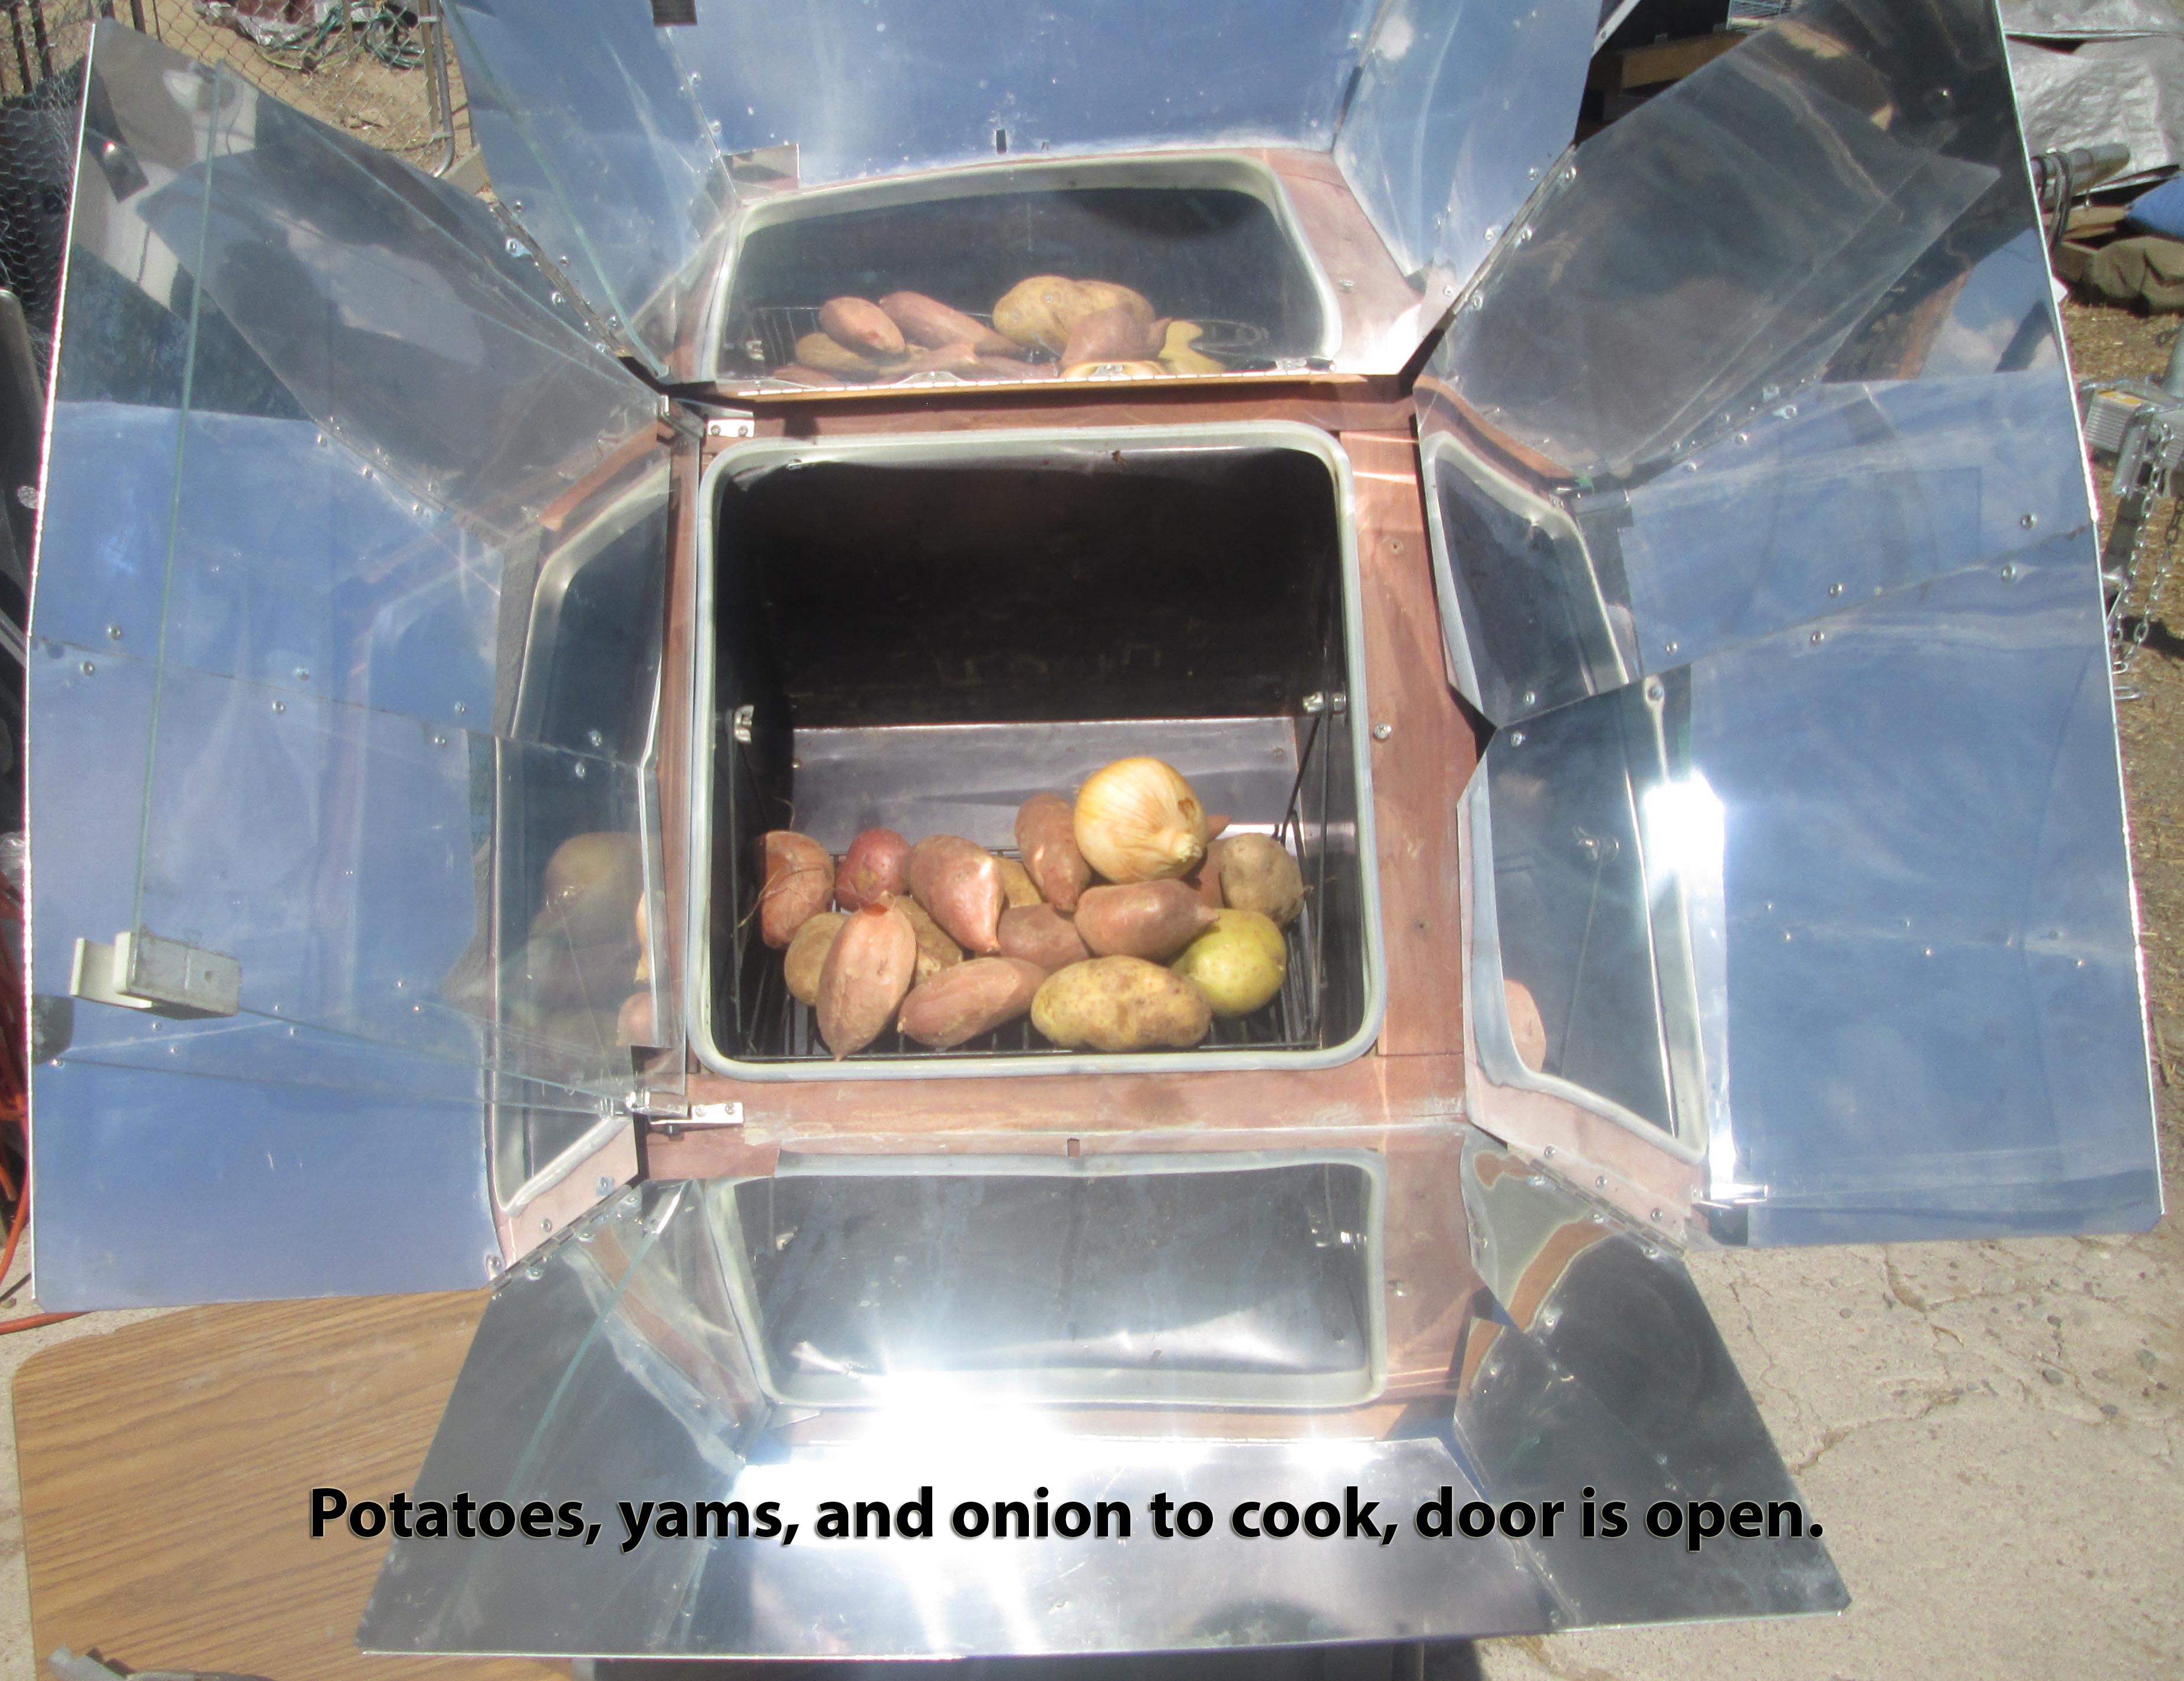
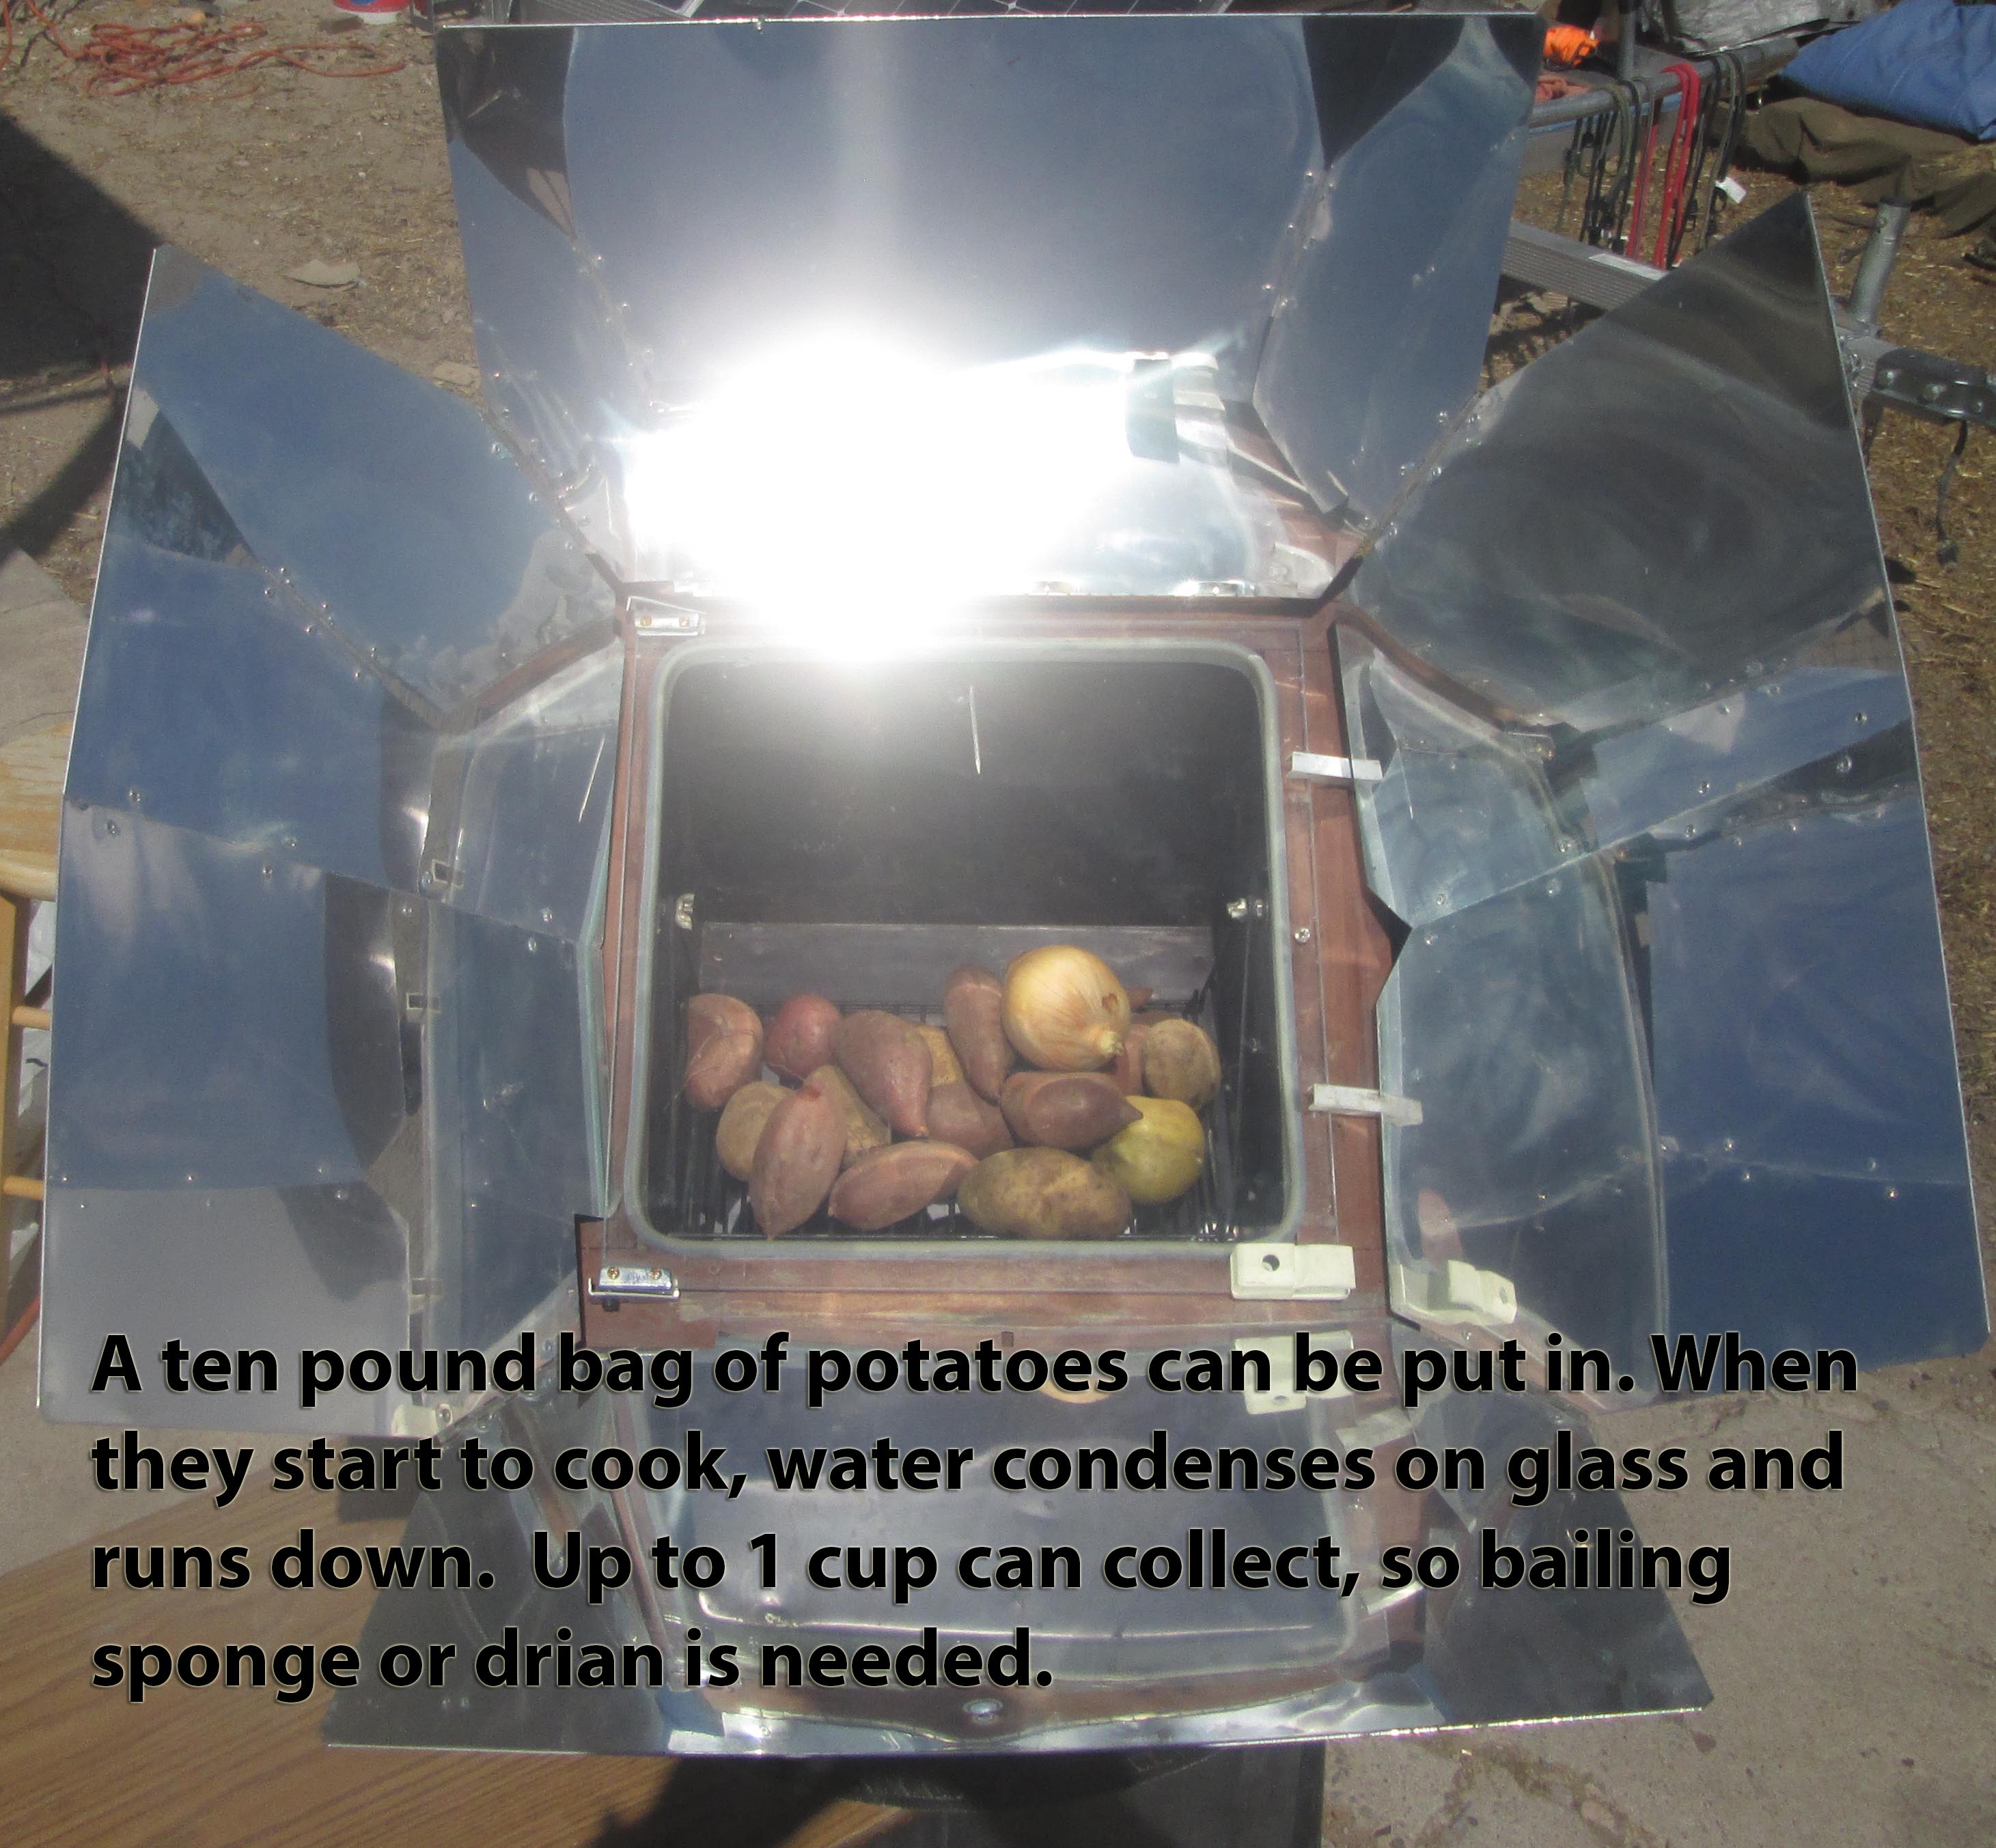
The All American SUN OVEN® is about $300 without accessories. It is a solar slow cooker. The only thing oven-like is that medium sized ovenware dishes and trays fit inside (unlike the original SUN OVEN®). Unlike a pot in a glass bowl, you can dump a 10 lb bag of potatoes in a SUN OVEN® and even fit a small turkey in it.
For $399, I got a solar slow cooker that, with time, effort, and modification, worked reasonably well. You can put a black pot in a bag on the dash of a parked car and do solar cooking, so claiming "it works" isn't saying much as almost any design will work. A $5 DIY solar cooker will work.
If you happen to have a SUN OVEN®, however, consider modifying it to not merely work, but to work reasonably well. It takes some time, effort, and more money, but if you're going to go solar, might as well do it better. The assumption behind the SUN OVEN®'s design is that you are a solar cooking enthusiast who will tend the cooker about every 30 minutes and ignore any design oversights as you are just so easily impressed. The routine goes something like this:
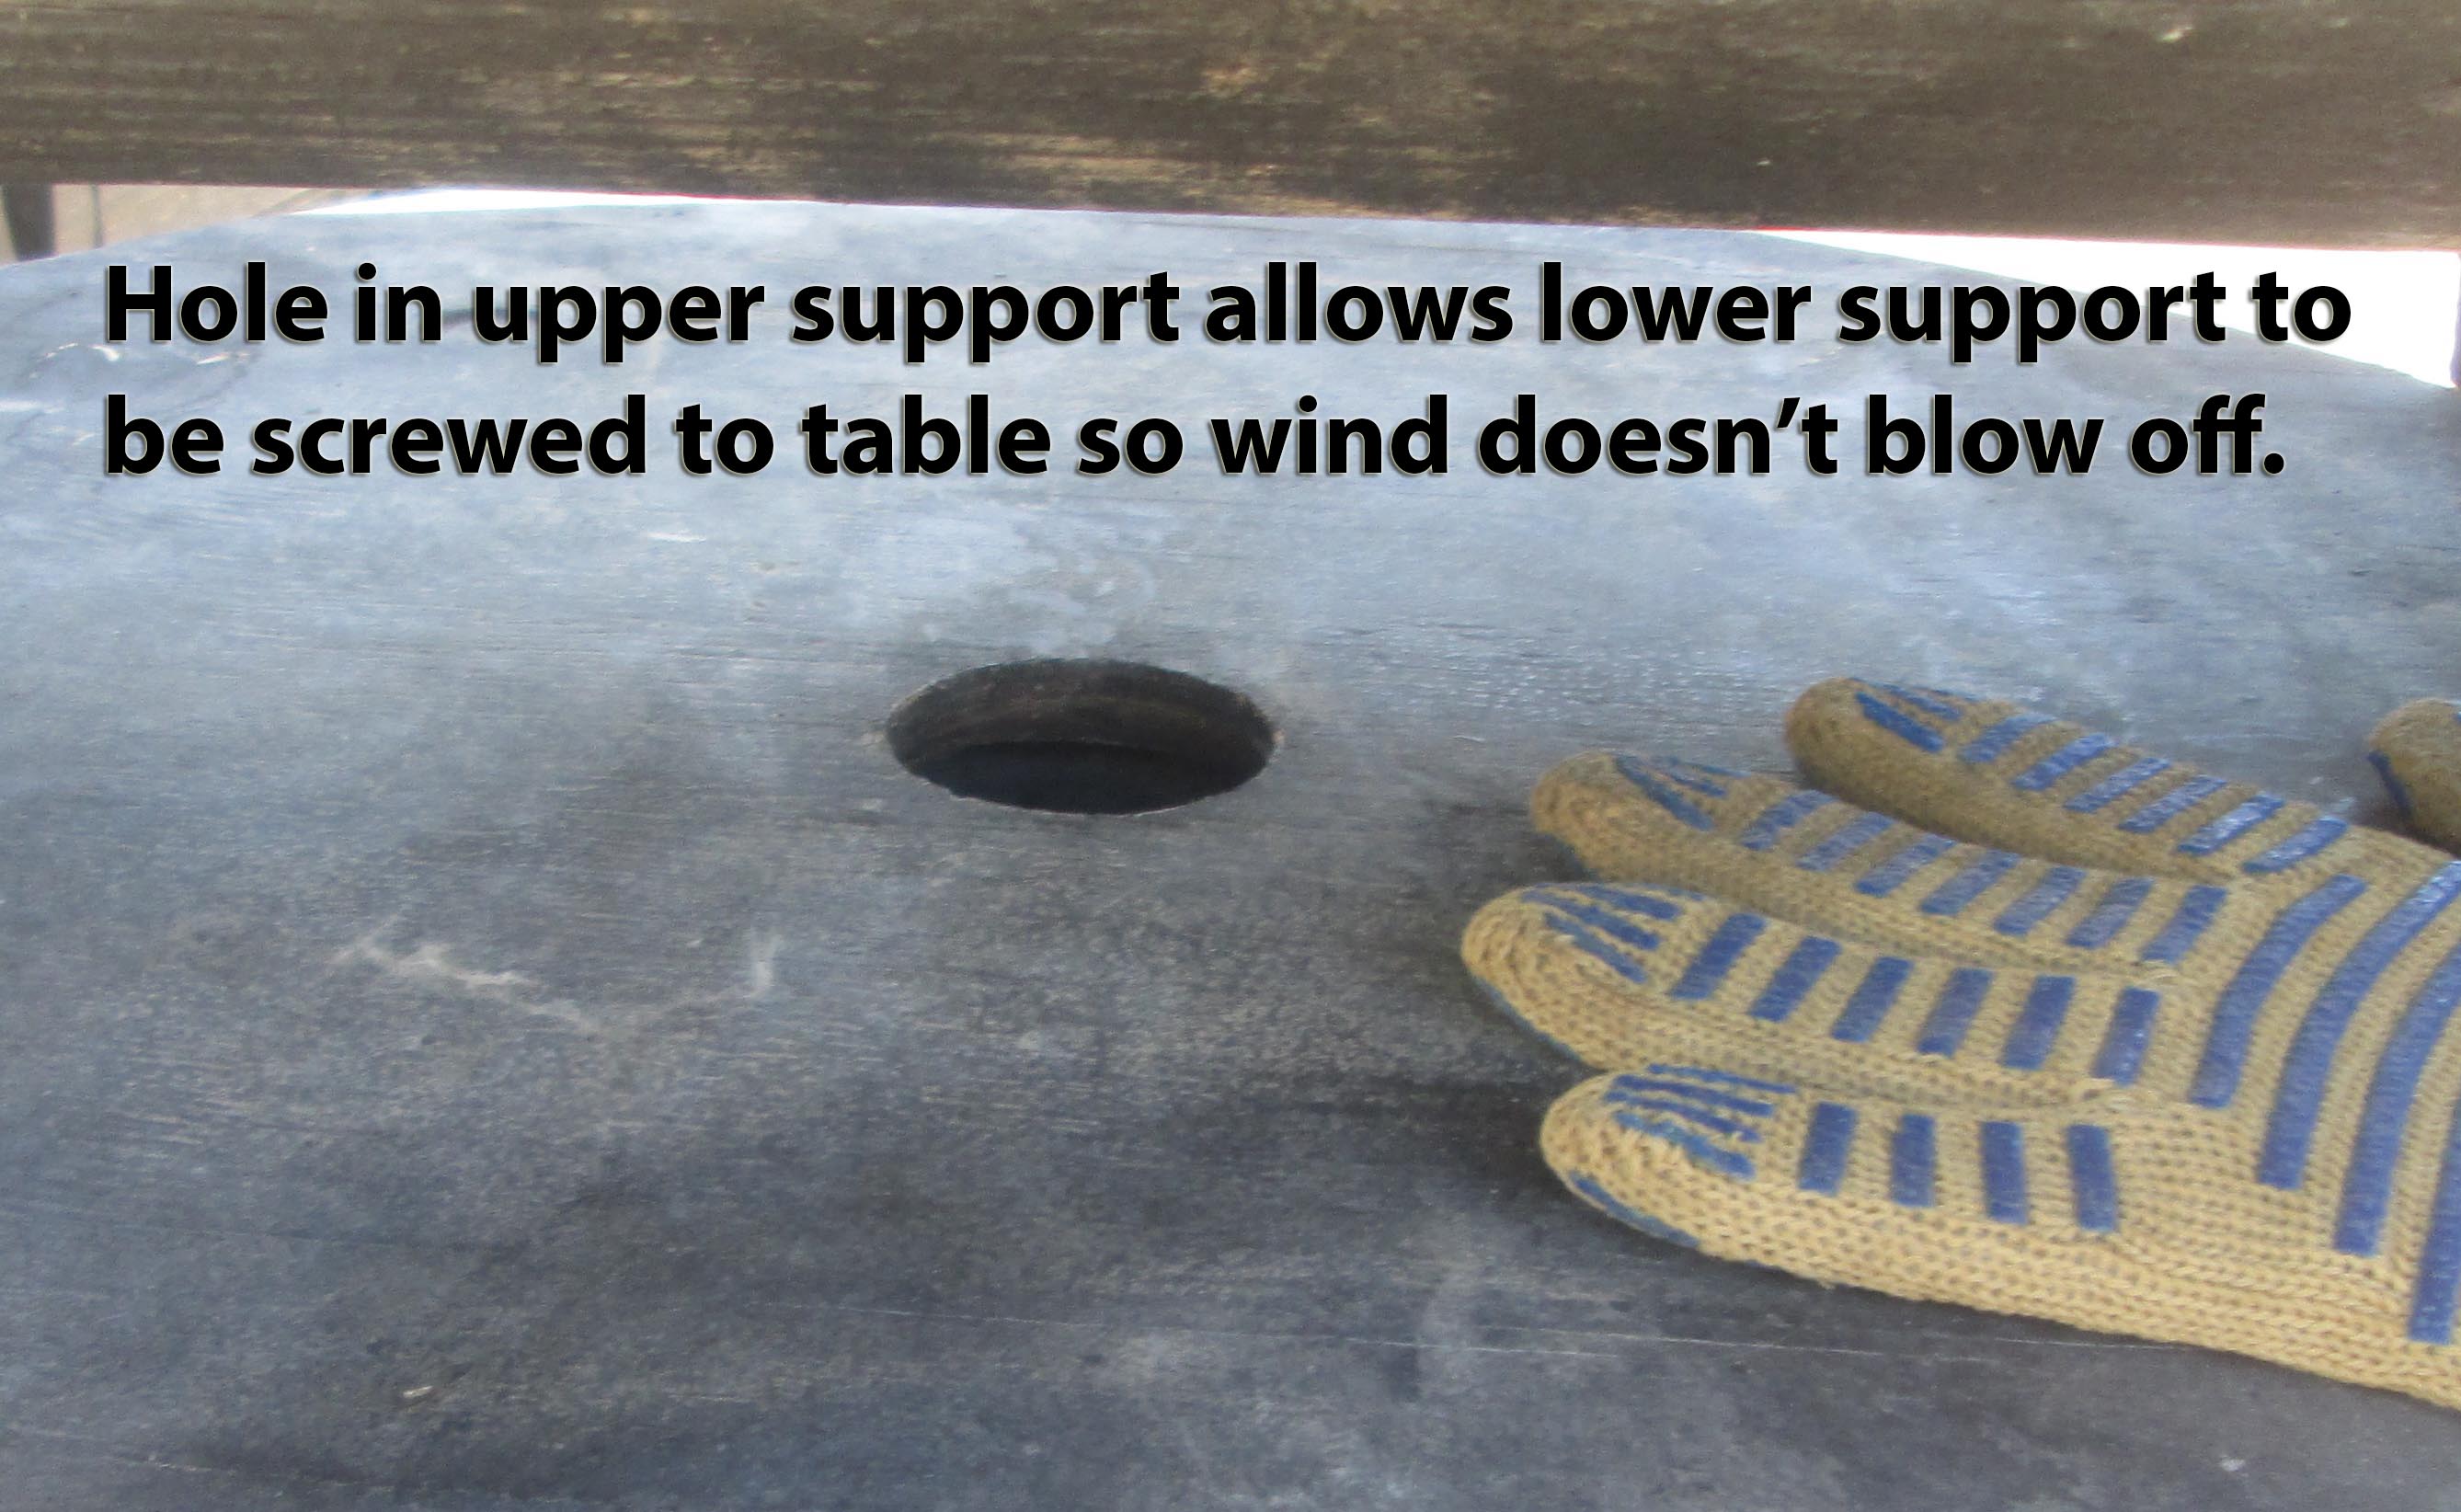
Minute by minute tracking of the sun is not needed, but moving the cooker about every 30 to 45 minutes is. This involves rotating and changing the tilt angle. Changing the tilt angle involves adjusting the length of an aluminum tube that is recessed into the backside. A spring loaded pin protrudes from the side of the tube and sticks through one of various holes in an aluminum plate. To adjust you have to tilt the cooker forward to take weight off the support and press the pin in with one hand while twisting the support with the other. Once the pin is to the side and out of the hole it can be slid up or down to the next hole and twisted until it clicks. The cooker is then put back down and rotated to point to the sun. This is a two hand/arm operation, which can get old even if there wasn't more to it.
If set on the ground, then being blown over by a gust won't destroy the SUN OVEN® and the All American one comes with two metal stakes you can drive into the ground and pull up and drive in again as needed (but hey, you're an enthusiast, right?). Sitting the SUN OVEN® on a table would seem obvious, and is, but getting blown off can cause serious damage. When fully tilted a slight wind can blow it over. Preventing this requires attaching (as in tying down) the SUN OVEN® to the table or whatever you have to set it on. This works, but adjusting the SUN OVEN® also involves tying and untying it multiple times with each use. For the non-enthusiast this gets old.
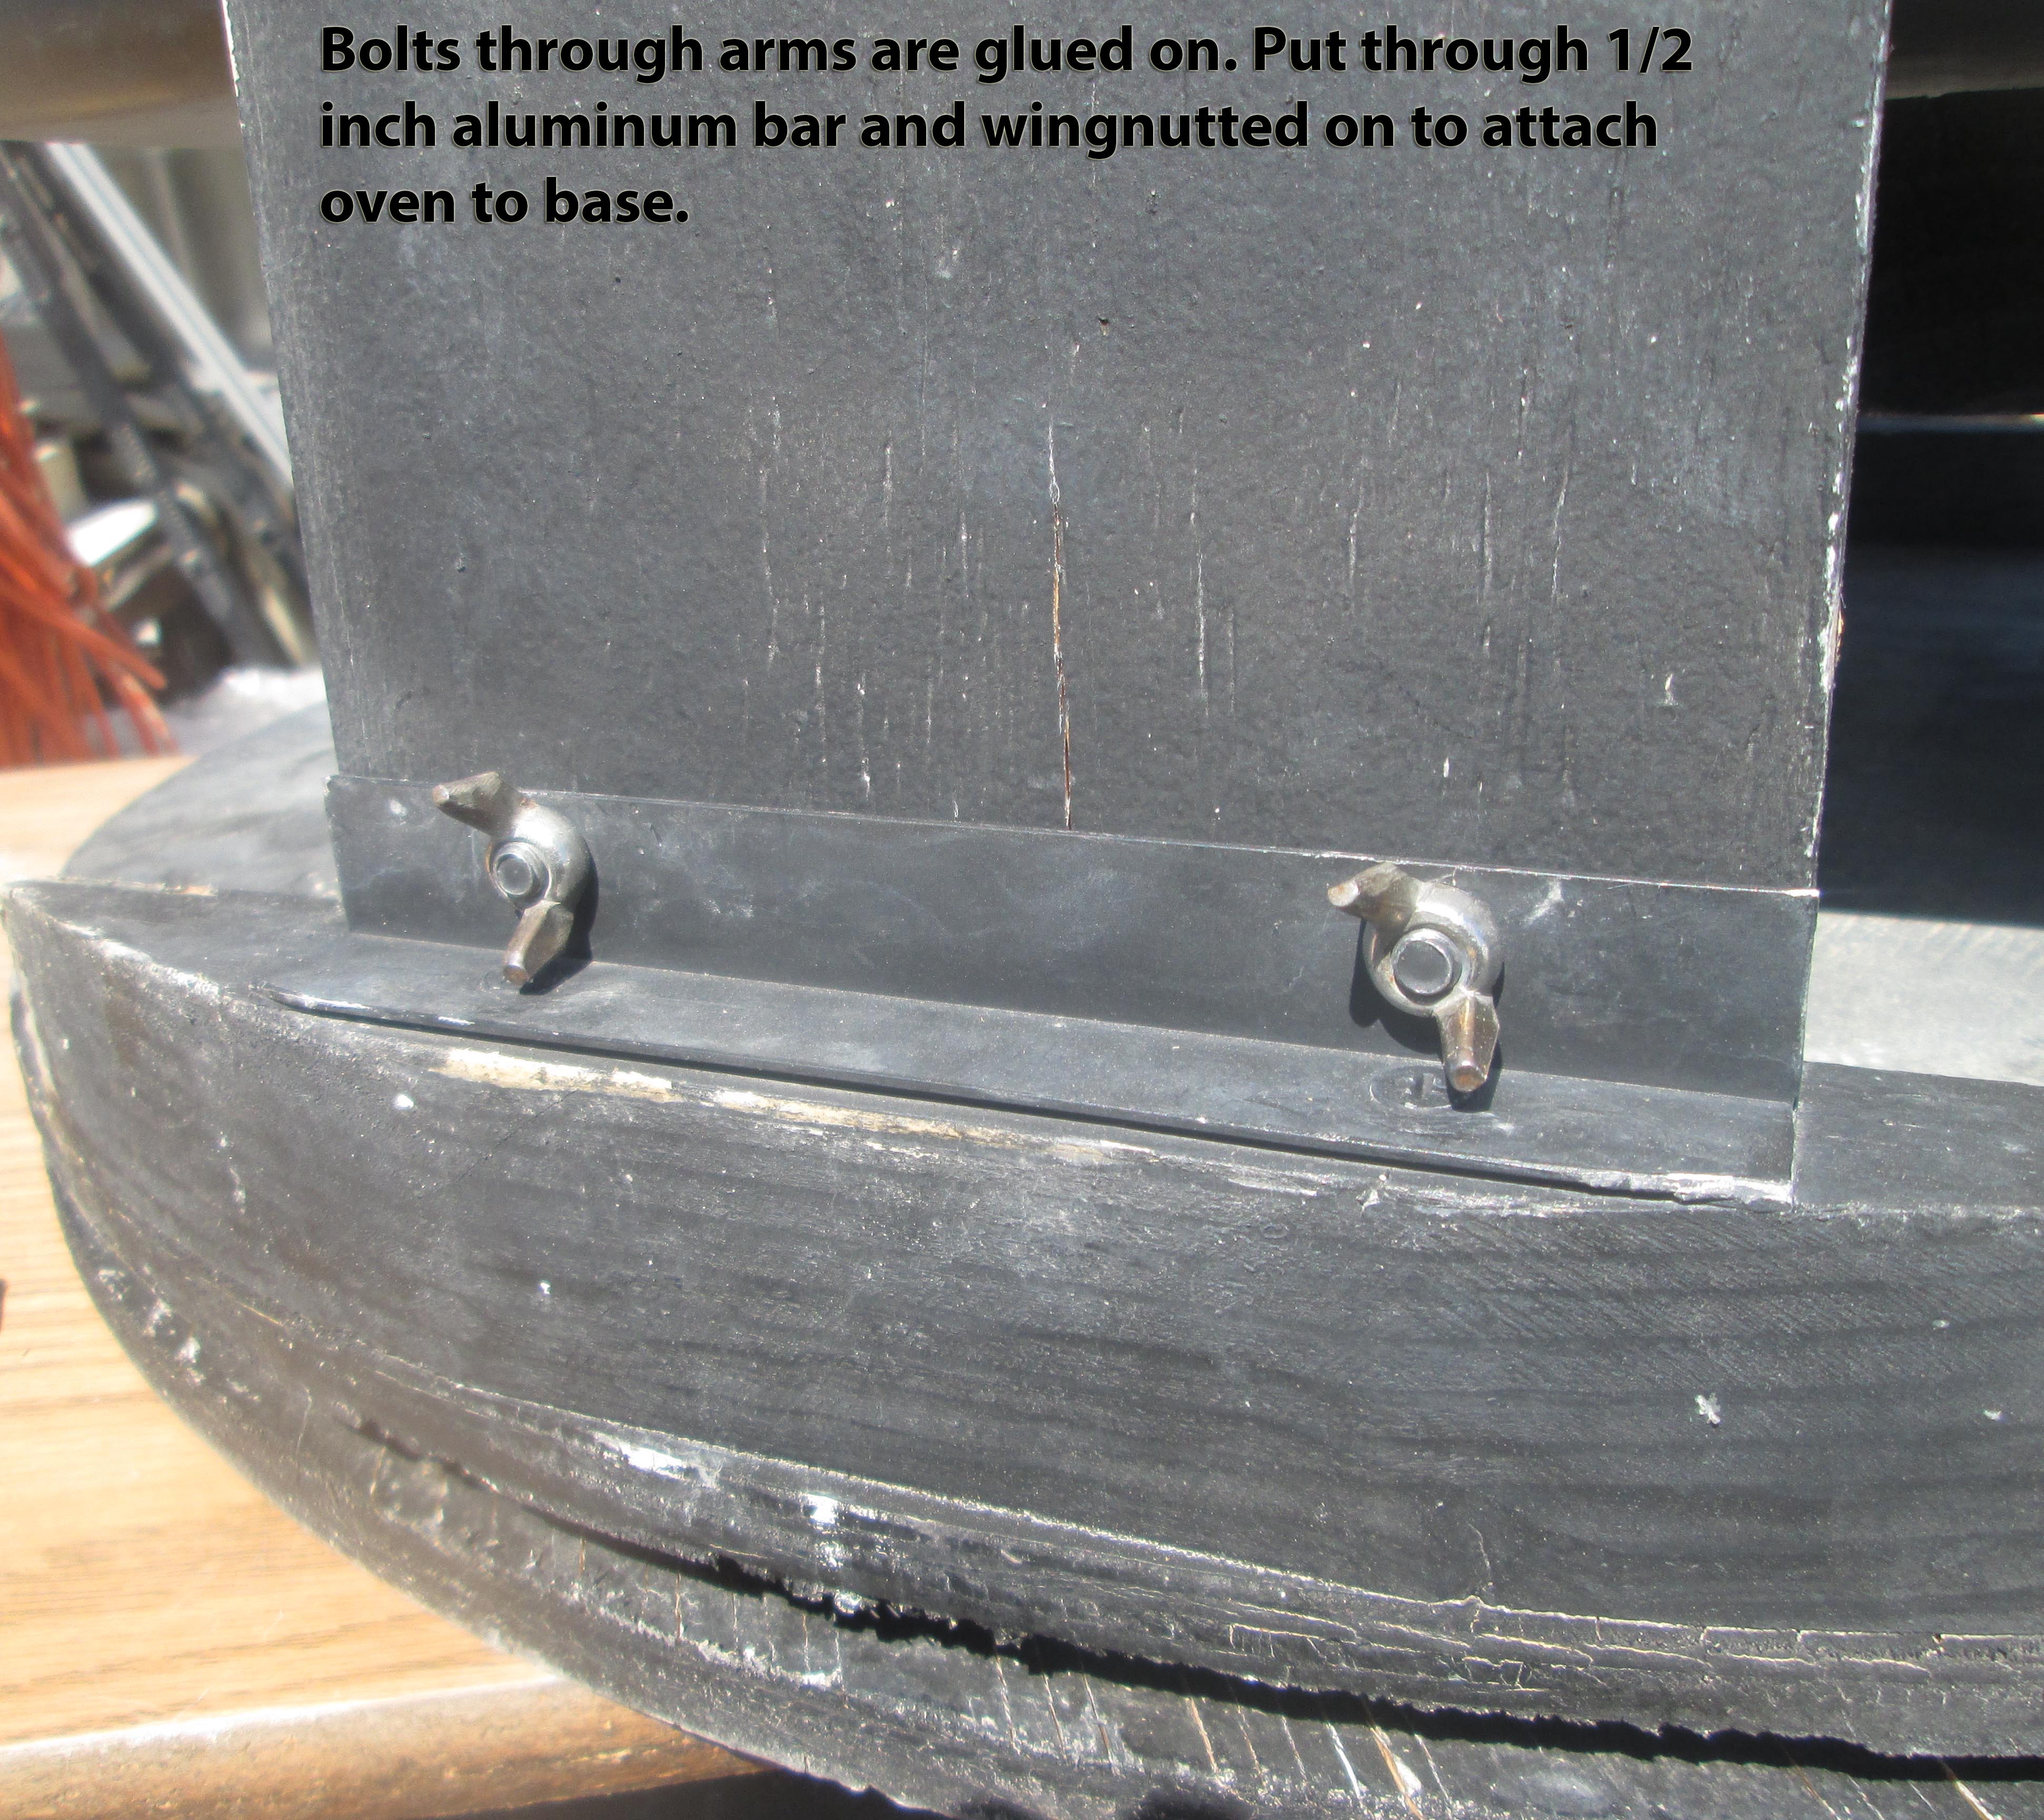
 The rack inside hangs on two bolts to level what is on it. When moved, the rack swings a bit and one or both arms come off, often after even minor moving. The first mod made was to add two wingnuts to prevent this. Wingnuts not included. Nuts are just to keep arms from falling off, so not tight at all, so any nut that fits will do.
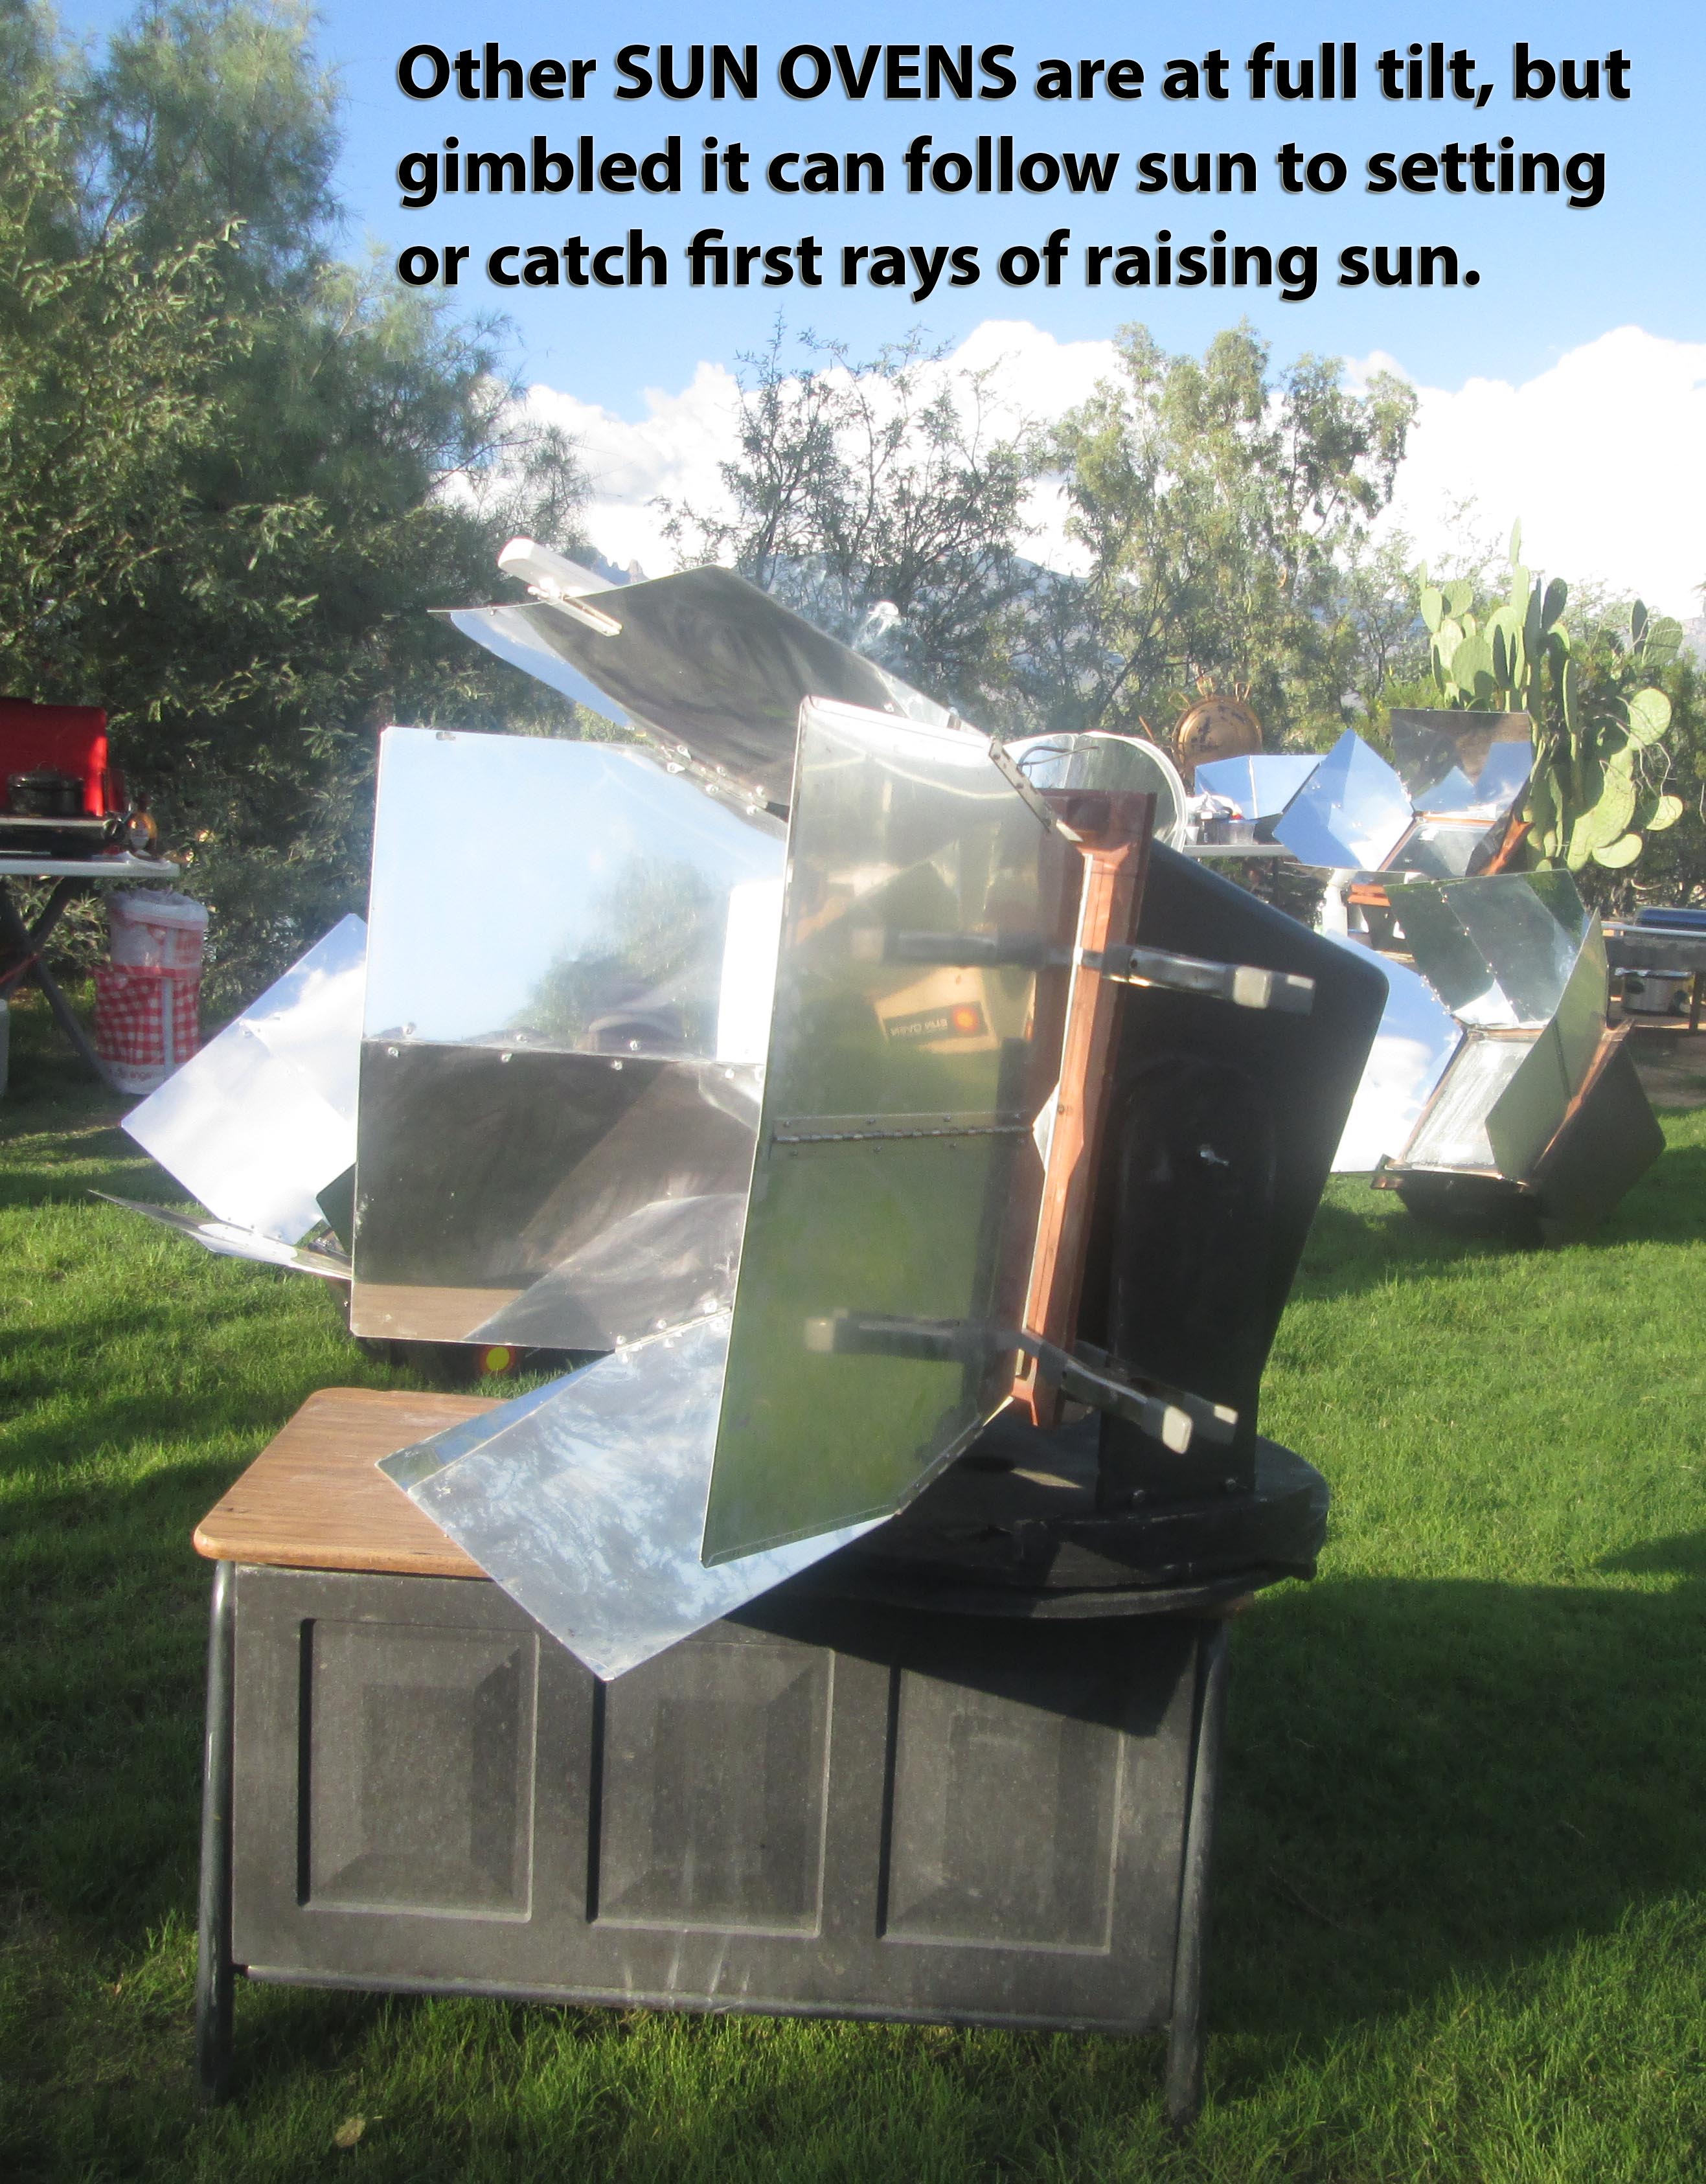
An obvious modification that significantly improves the functionality of the SUN OVEN® is to attach a lazy Susan to whatever and attach the SUN OVEN® to it in such a way that it can be readily detached for transportation. But wait, why stop there? Also gimble the cooker to allow the tilt angle to be easily changed. Adjusting the SUN OVEN® becomes a one handed (two finger) operation that takes a few seconds instead of a full upper body attack on a tied down SUN OVEN® taking minutes.
Details: Get a lazy Susan from most any hardware store or do what I did and order one from Amazon. The two base pieces were made from two ½ inch of 2' x 2' pieces of plywood which I cut to a circle with a gig saw. The one for the top is the same except I drilled a 1 inch hole in the middle to allow the lower one to be screwed down. The lazy Susan goes between. Screw to one piece and drill a hole to allow screws to be put in to hold the top piece. Drill a small hole in the middle of the bottom piece to allow for a screw to hold the whole piece down to whatever you put it on. I used an old school desk I got for $10 from a thrift store.
To make the two pieces perfectly round I just put the two next to a table saw blade and turned the top piece to round it, then turned it over and rounded the other piece. I added two pieces of wood to each side of the top piece to fasten the arms to. On top of the two side pieces was added pieces of ½ inch aluminum angle to which the arms attach.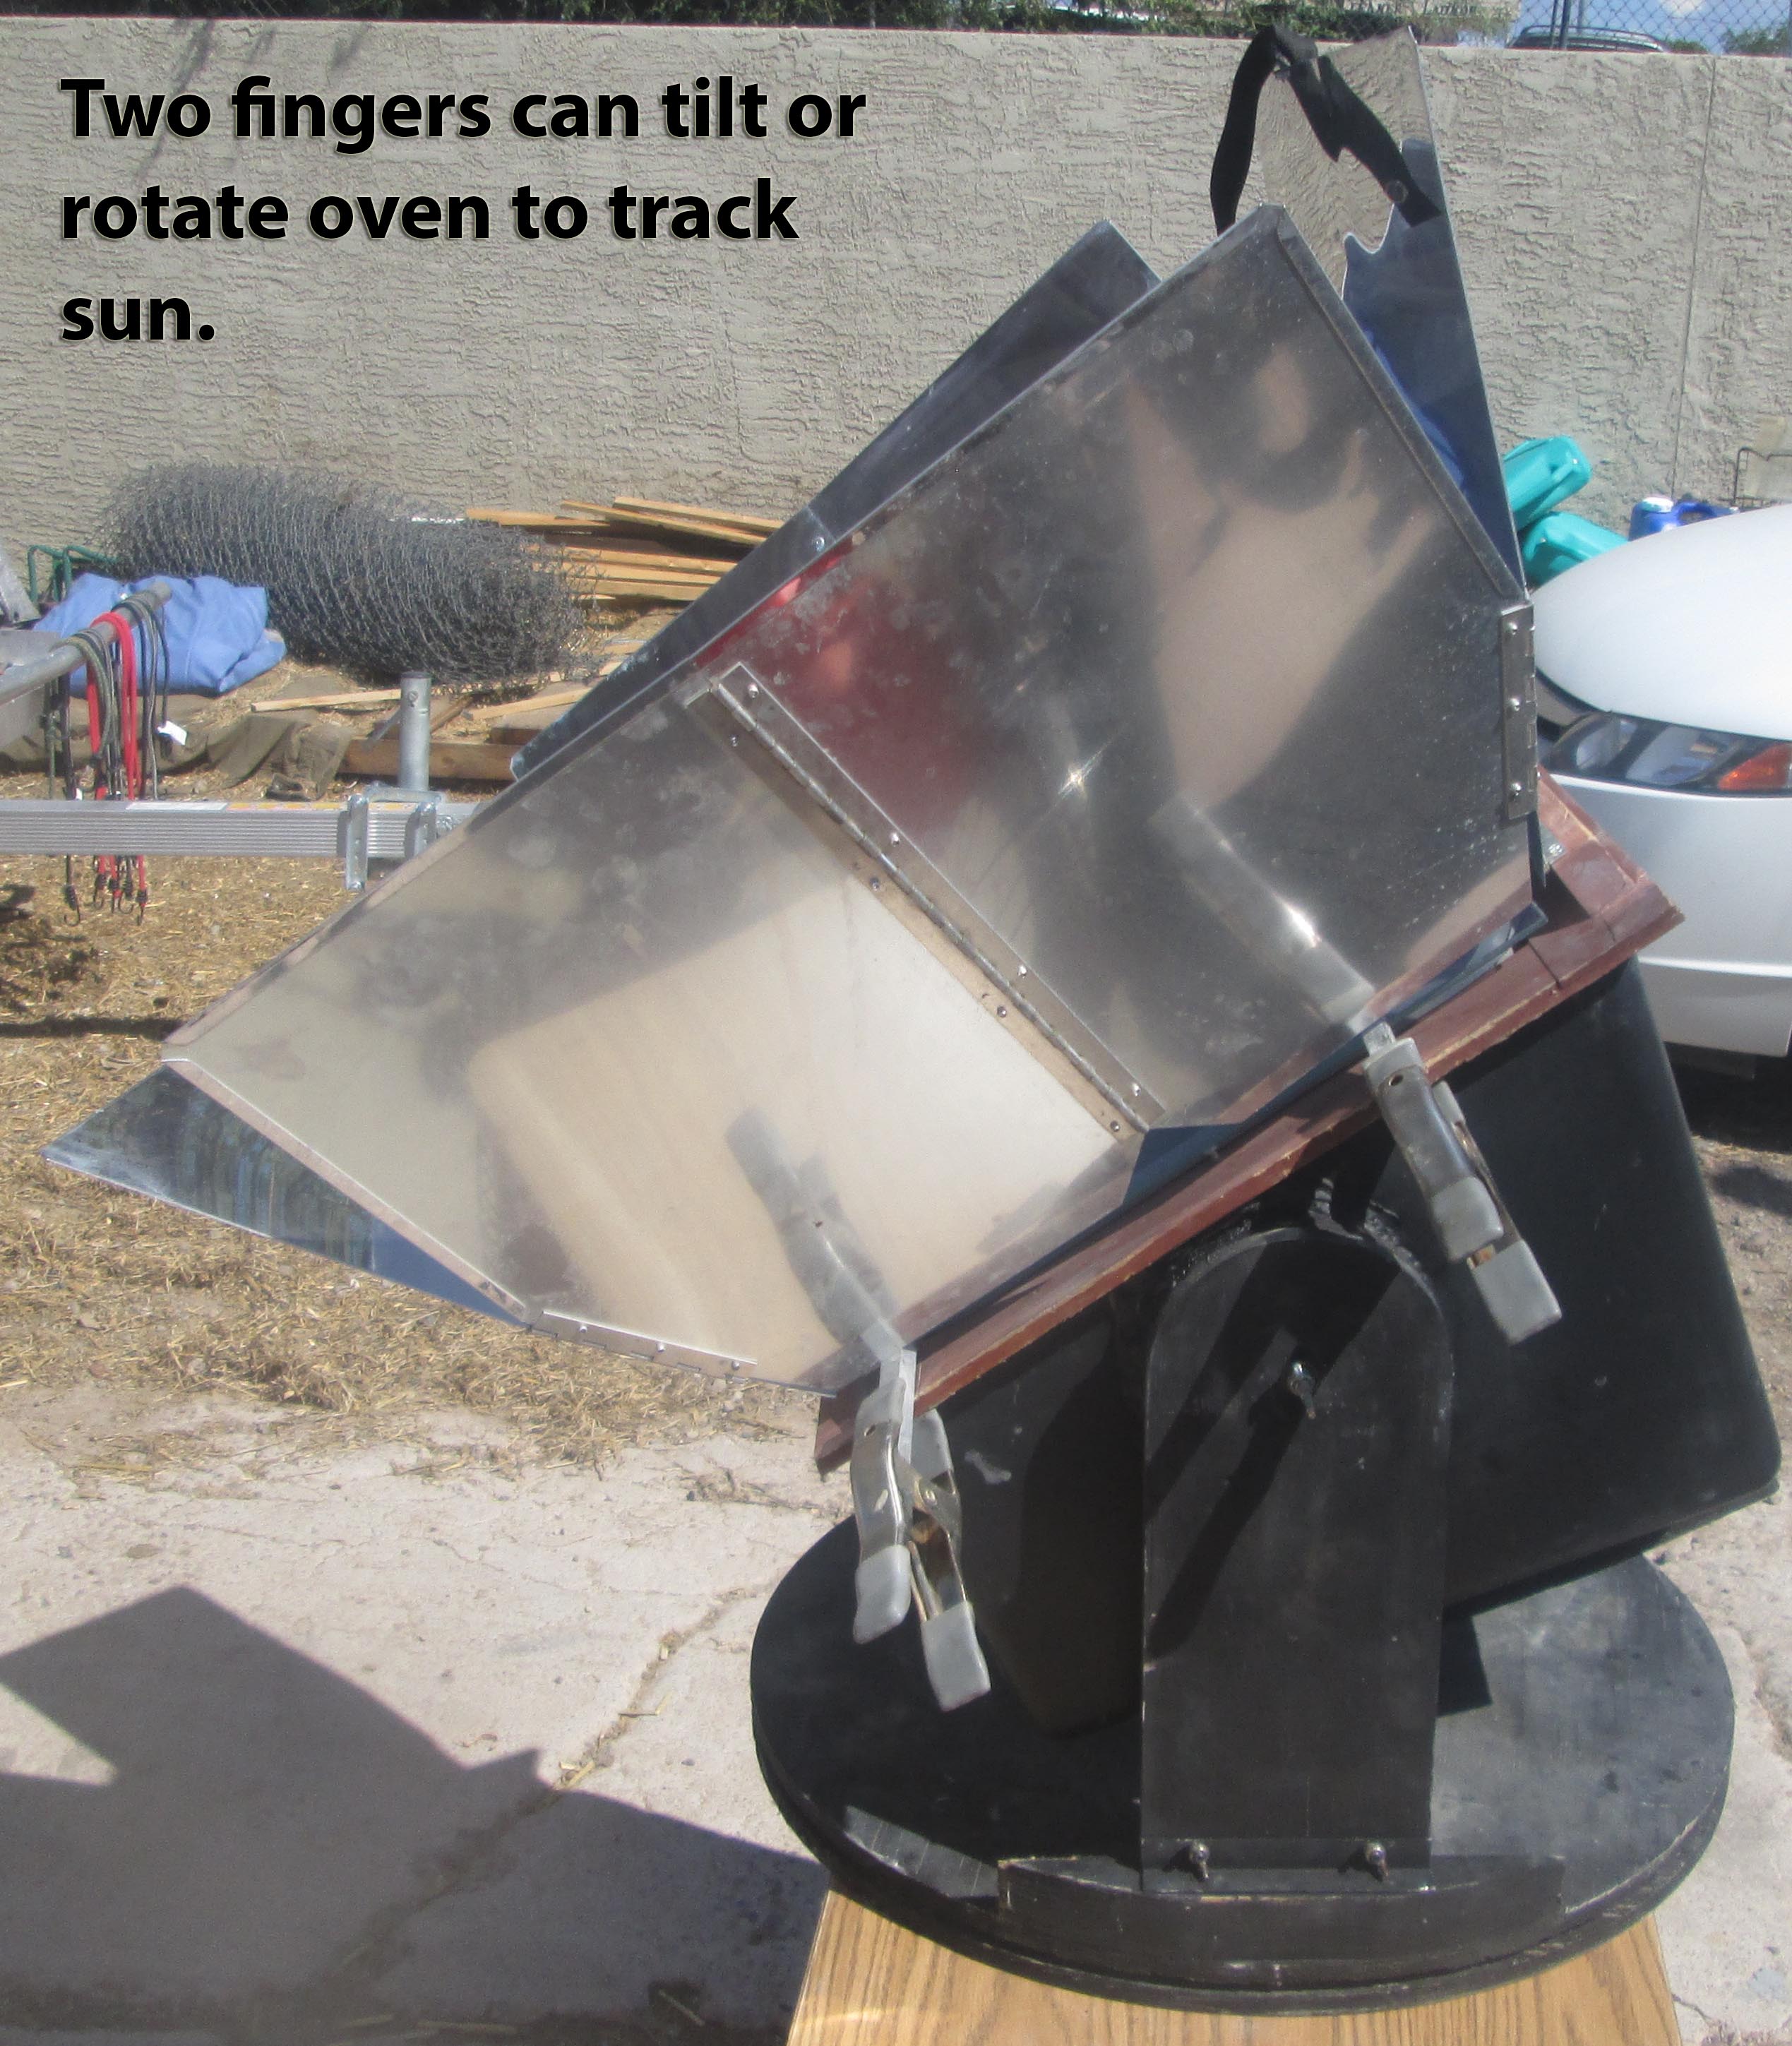
The modified box cooker was taken to Burning Man as only means to cook. Playa dust still evident.
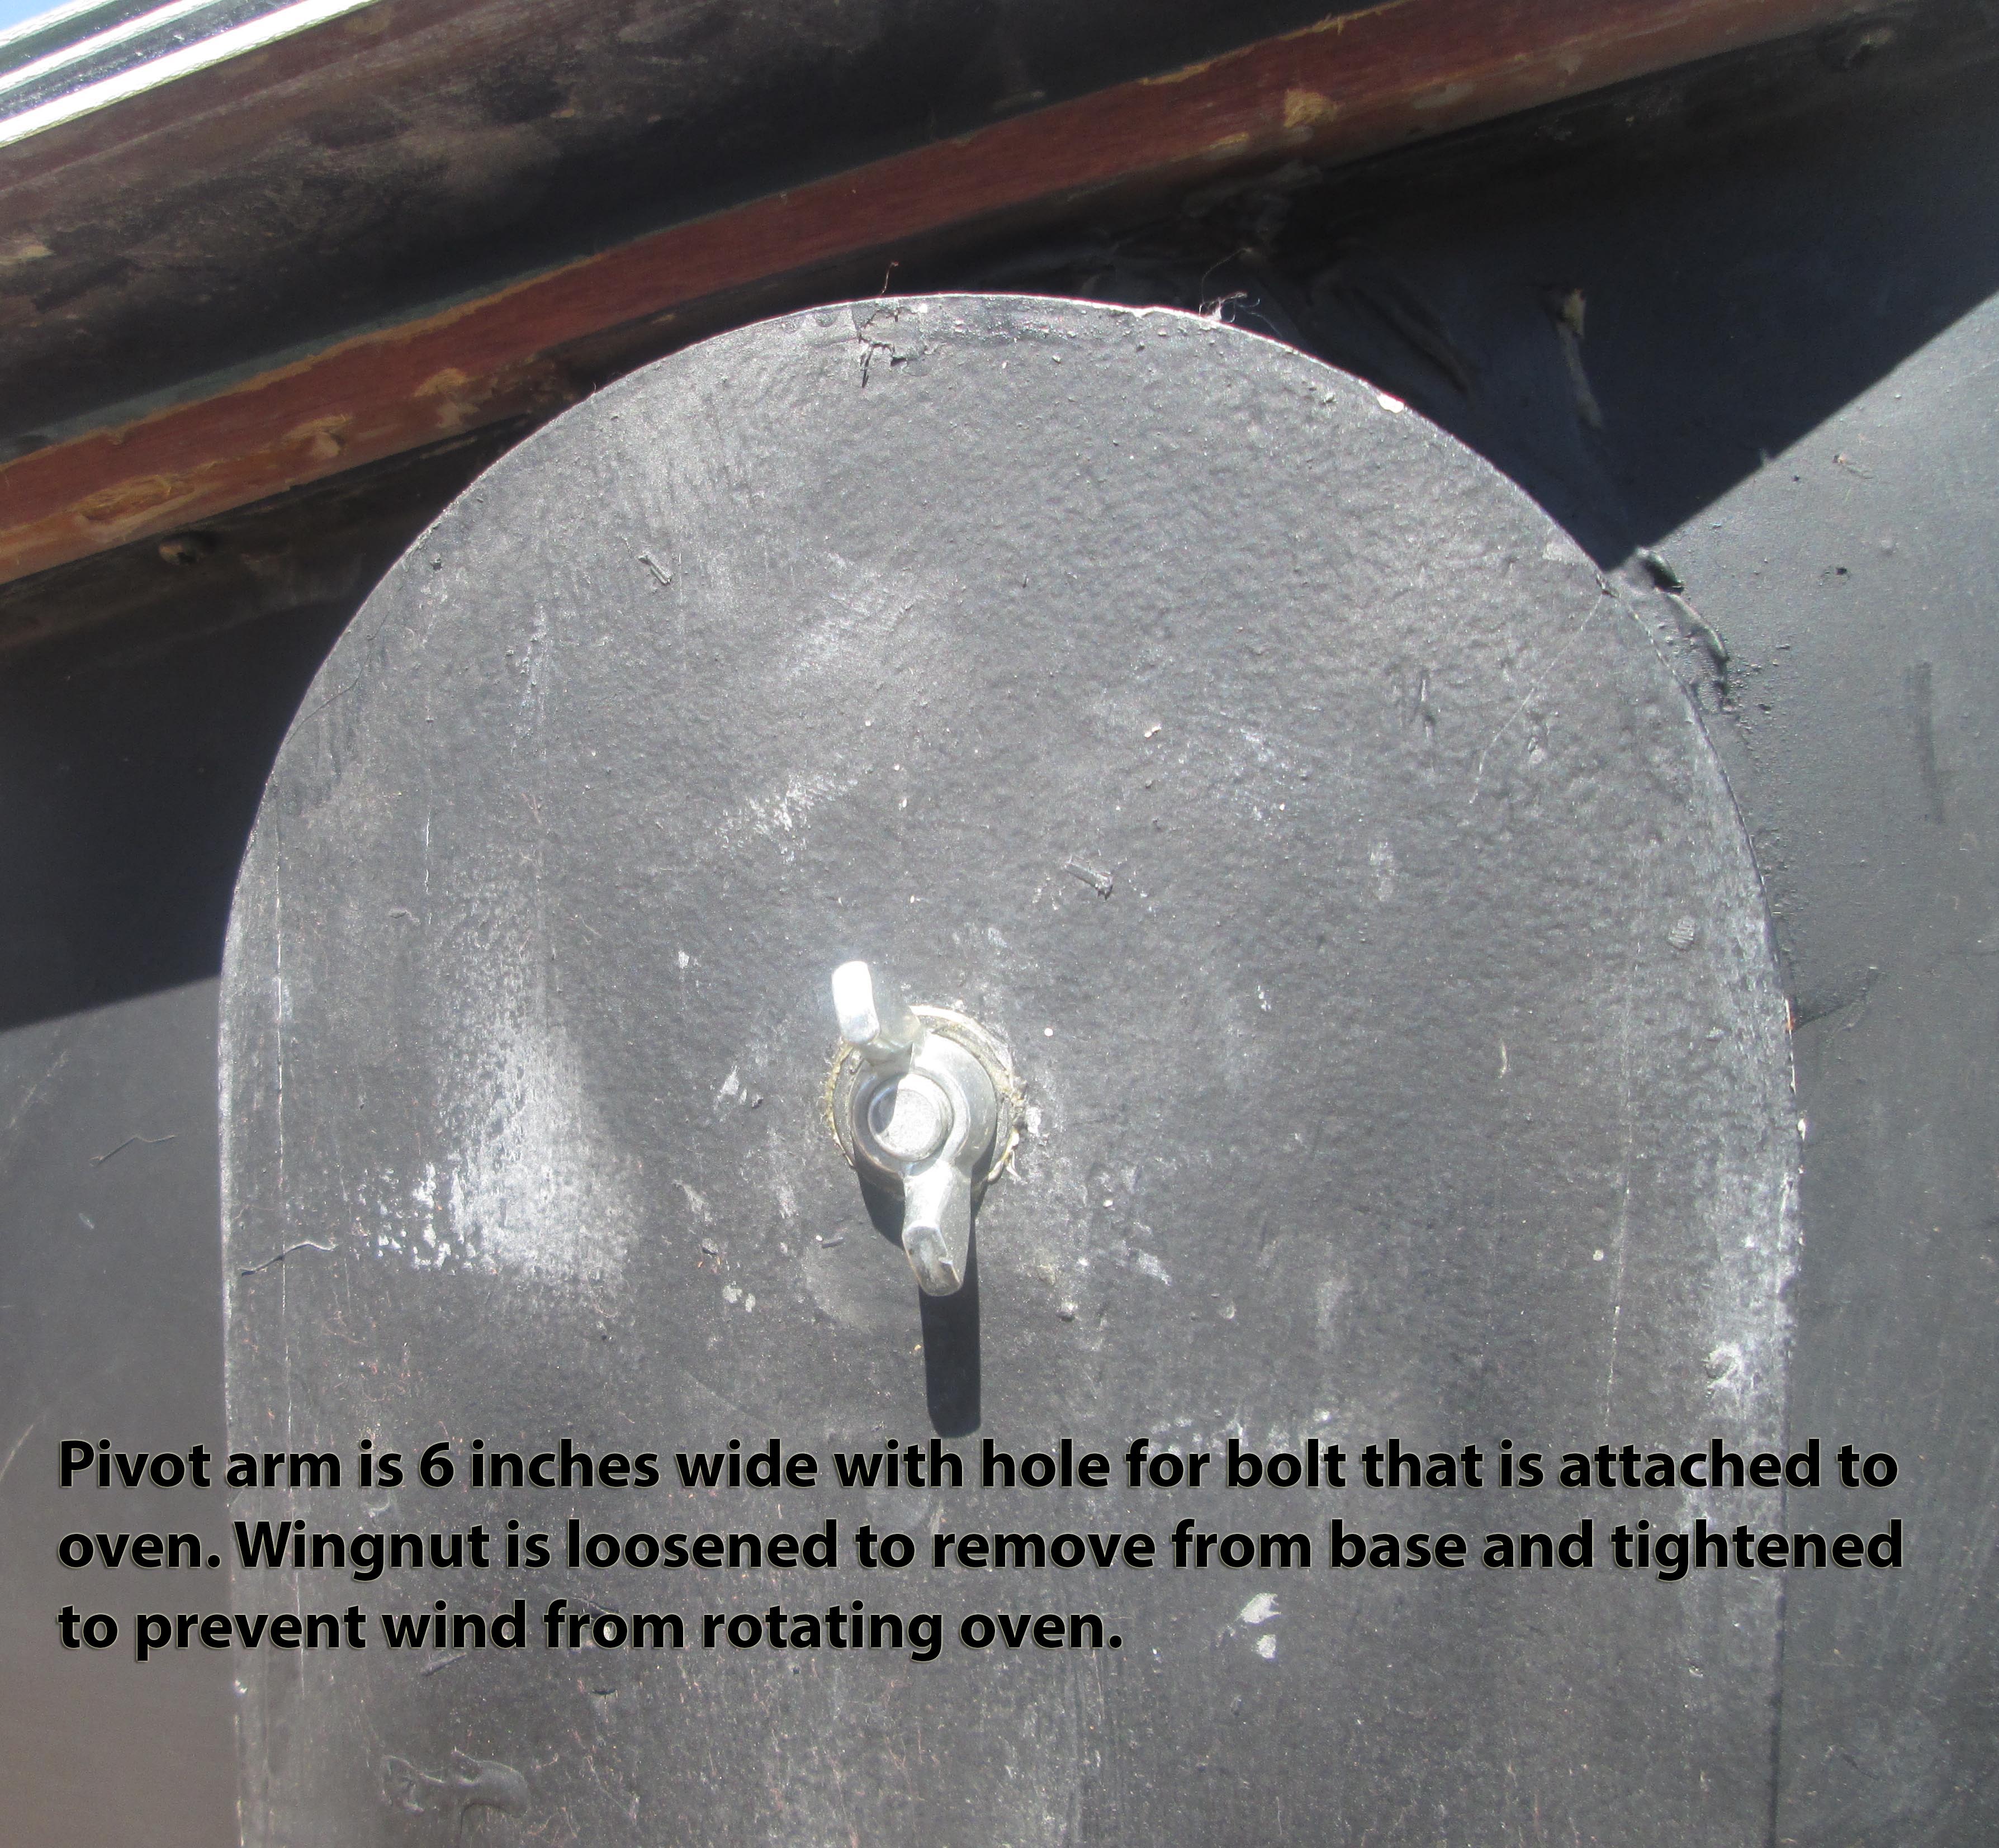
 The somewhat tricky part was to put two 1 inch thick pieces of 6 inch diameter plywood (each two ½ inch circles glued together) attached to the sides of the SUN OVEN®. From the middle extends a recessed bolt that the arms attach to. Attaching this circle, which I made thick to allow later adding more insulation, was tricky as the outside of the SUN OVEN® is plastic, probably polyethylene, which nothing sticks very well to.
The pivots touch the wooden lip of the SUN OVEN®, which supports the weight. The adhesive holds the pivots in place. Still, the sides were not flat and although the first adhesive used was PL Premium, which expands, large gaps later formed as the sides pulled away to take the shape they wanted to. I twice added more adhesive to fill in the openings. Although I had sanded to plastic until rough before gluing the sides on, partial separation happened. Better than sanding, drill a bunch of small holes in the outside plastic to give the glue something to mechanically grab to.
But after filling in gaps a few times the sides are attached good enough. Larger pivots create more surface area for the glue to stick. I used 6 inch diameter, but larger would give more area for the glue to stick to. Through bolting would work, but I didn't have to resort to doing so (bolts would conduct heat out).
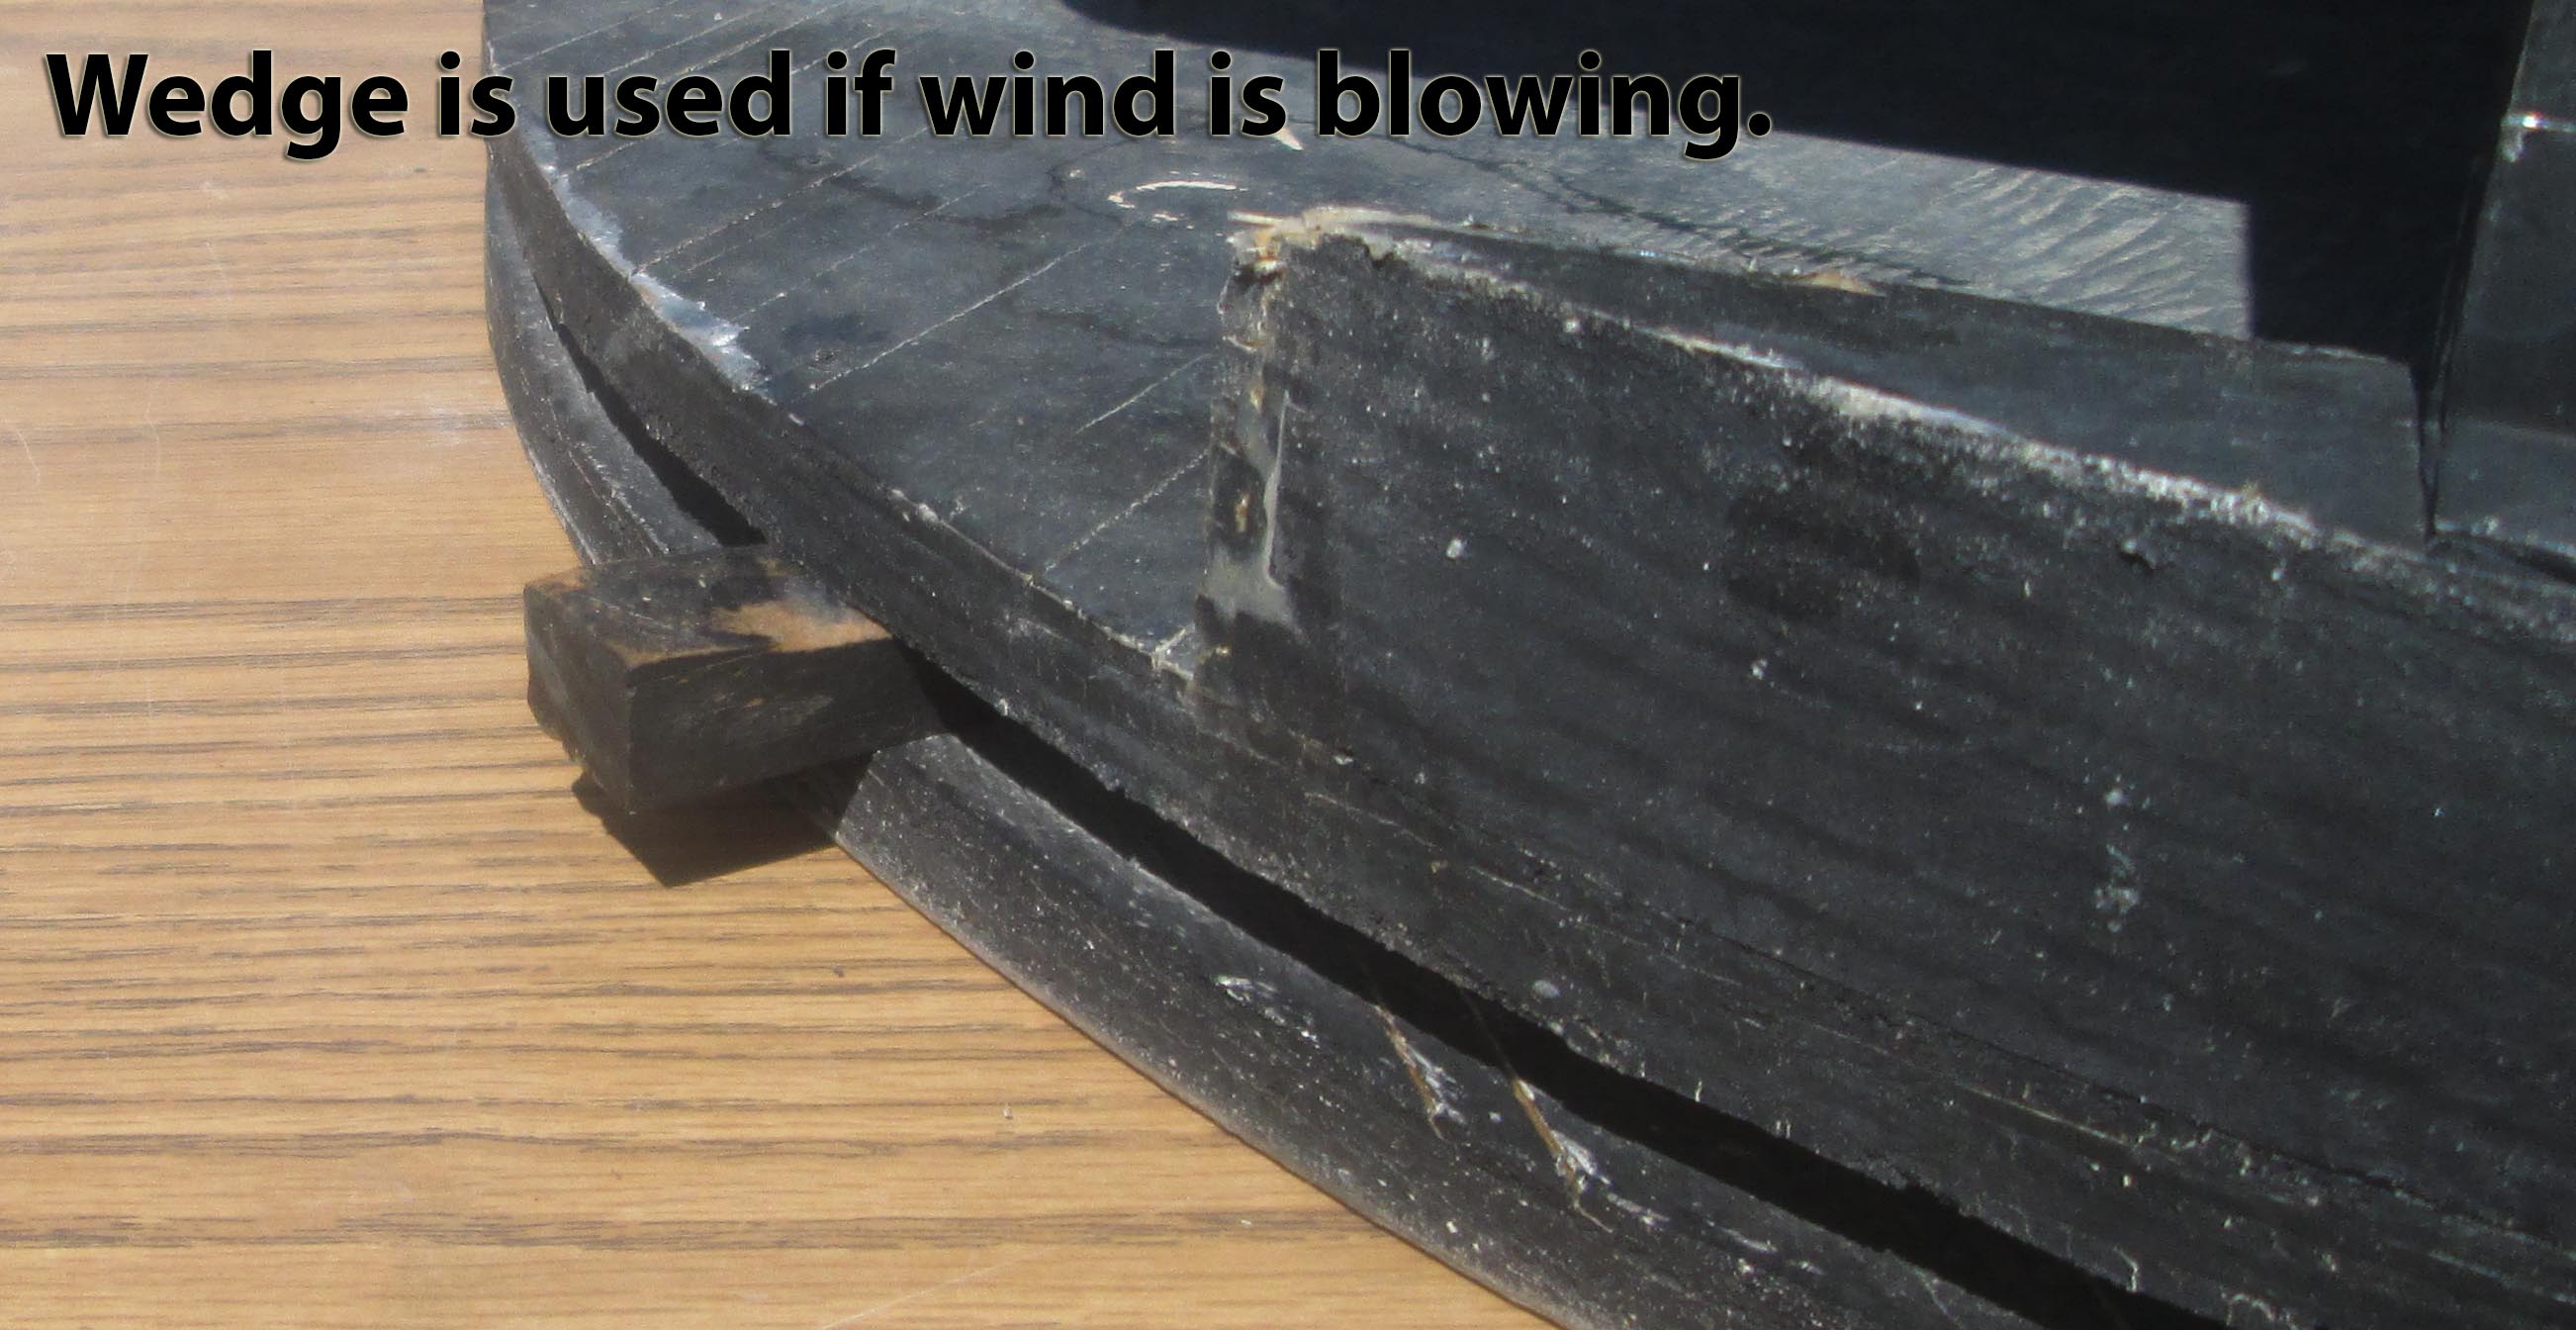
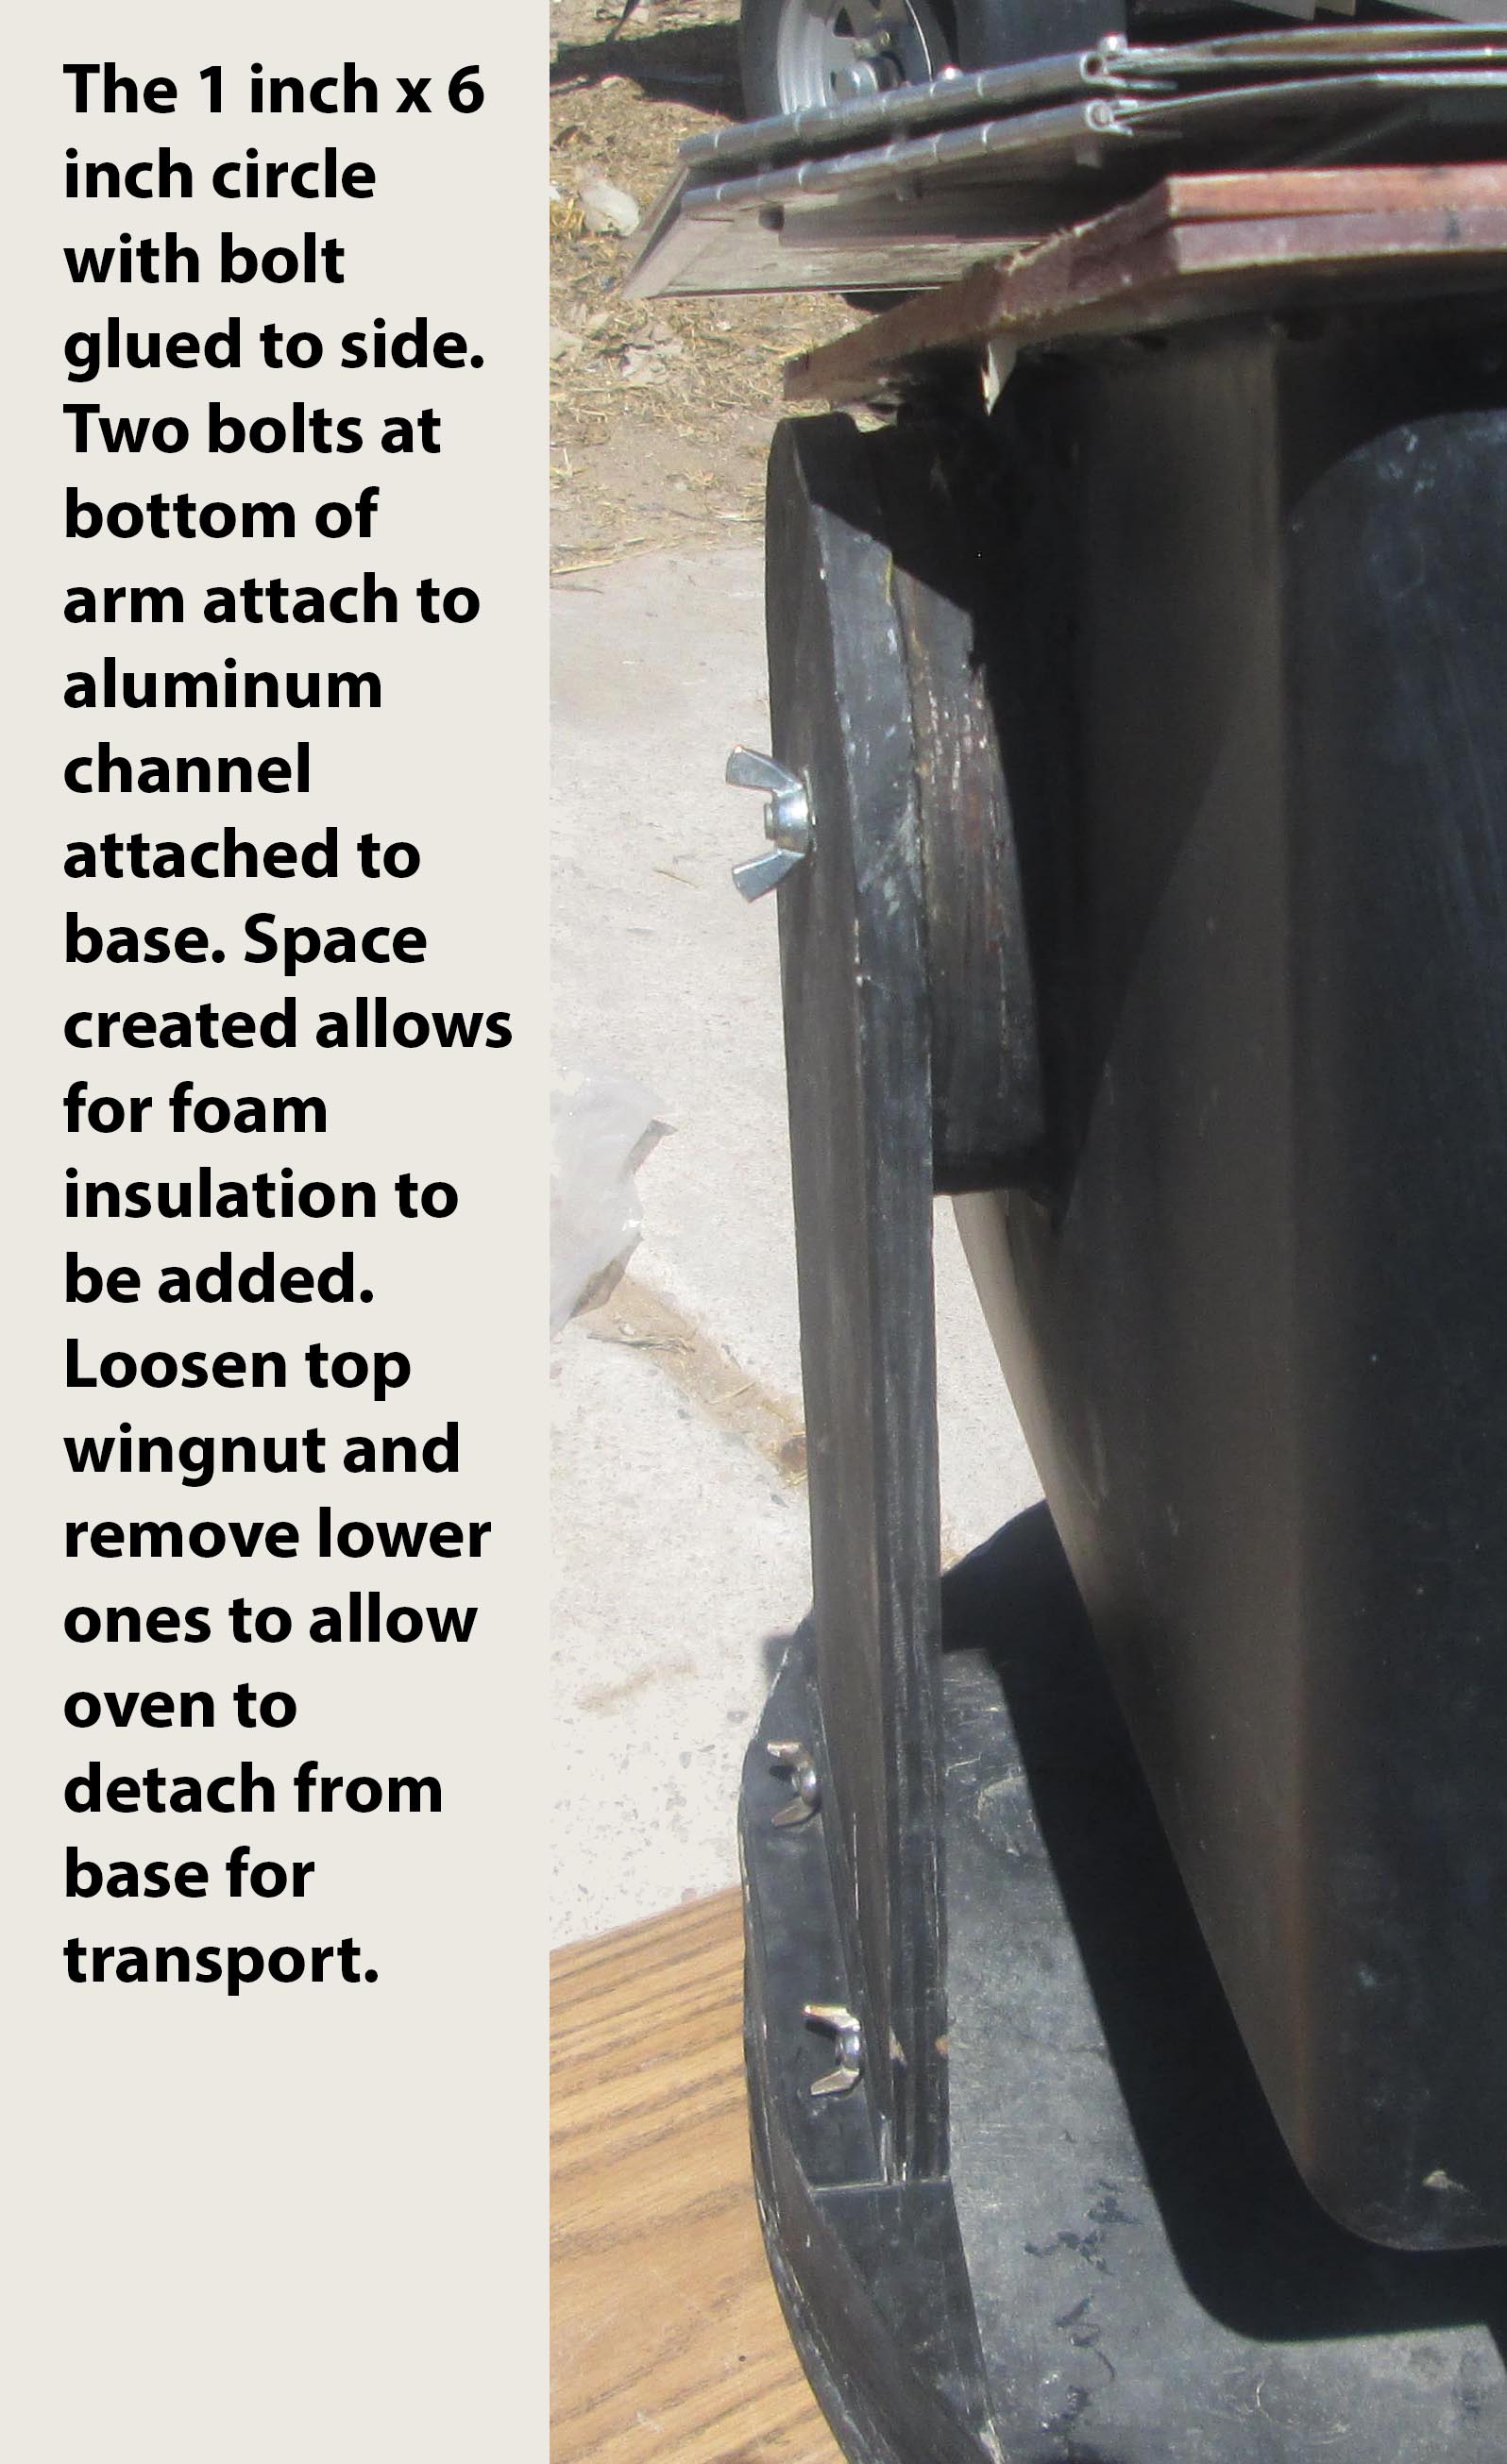
Wingnuts hold the arms on to base and to the cooker. The only other piece is a wood wedge used to keep the cooker from rotating in the wind. Just stick it between the two base pieces with the lazy Susan between. Adjusting involves removing the wedge, rotating and tilting, then put the wedge back in if wind is blowing. There is usually enough friction between the cooker and arms so it doesn't move in wind yet still tilts.
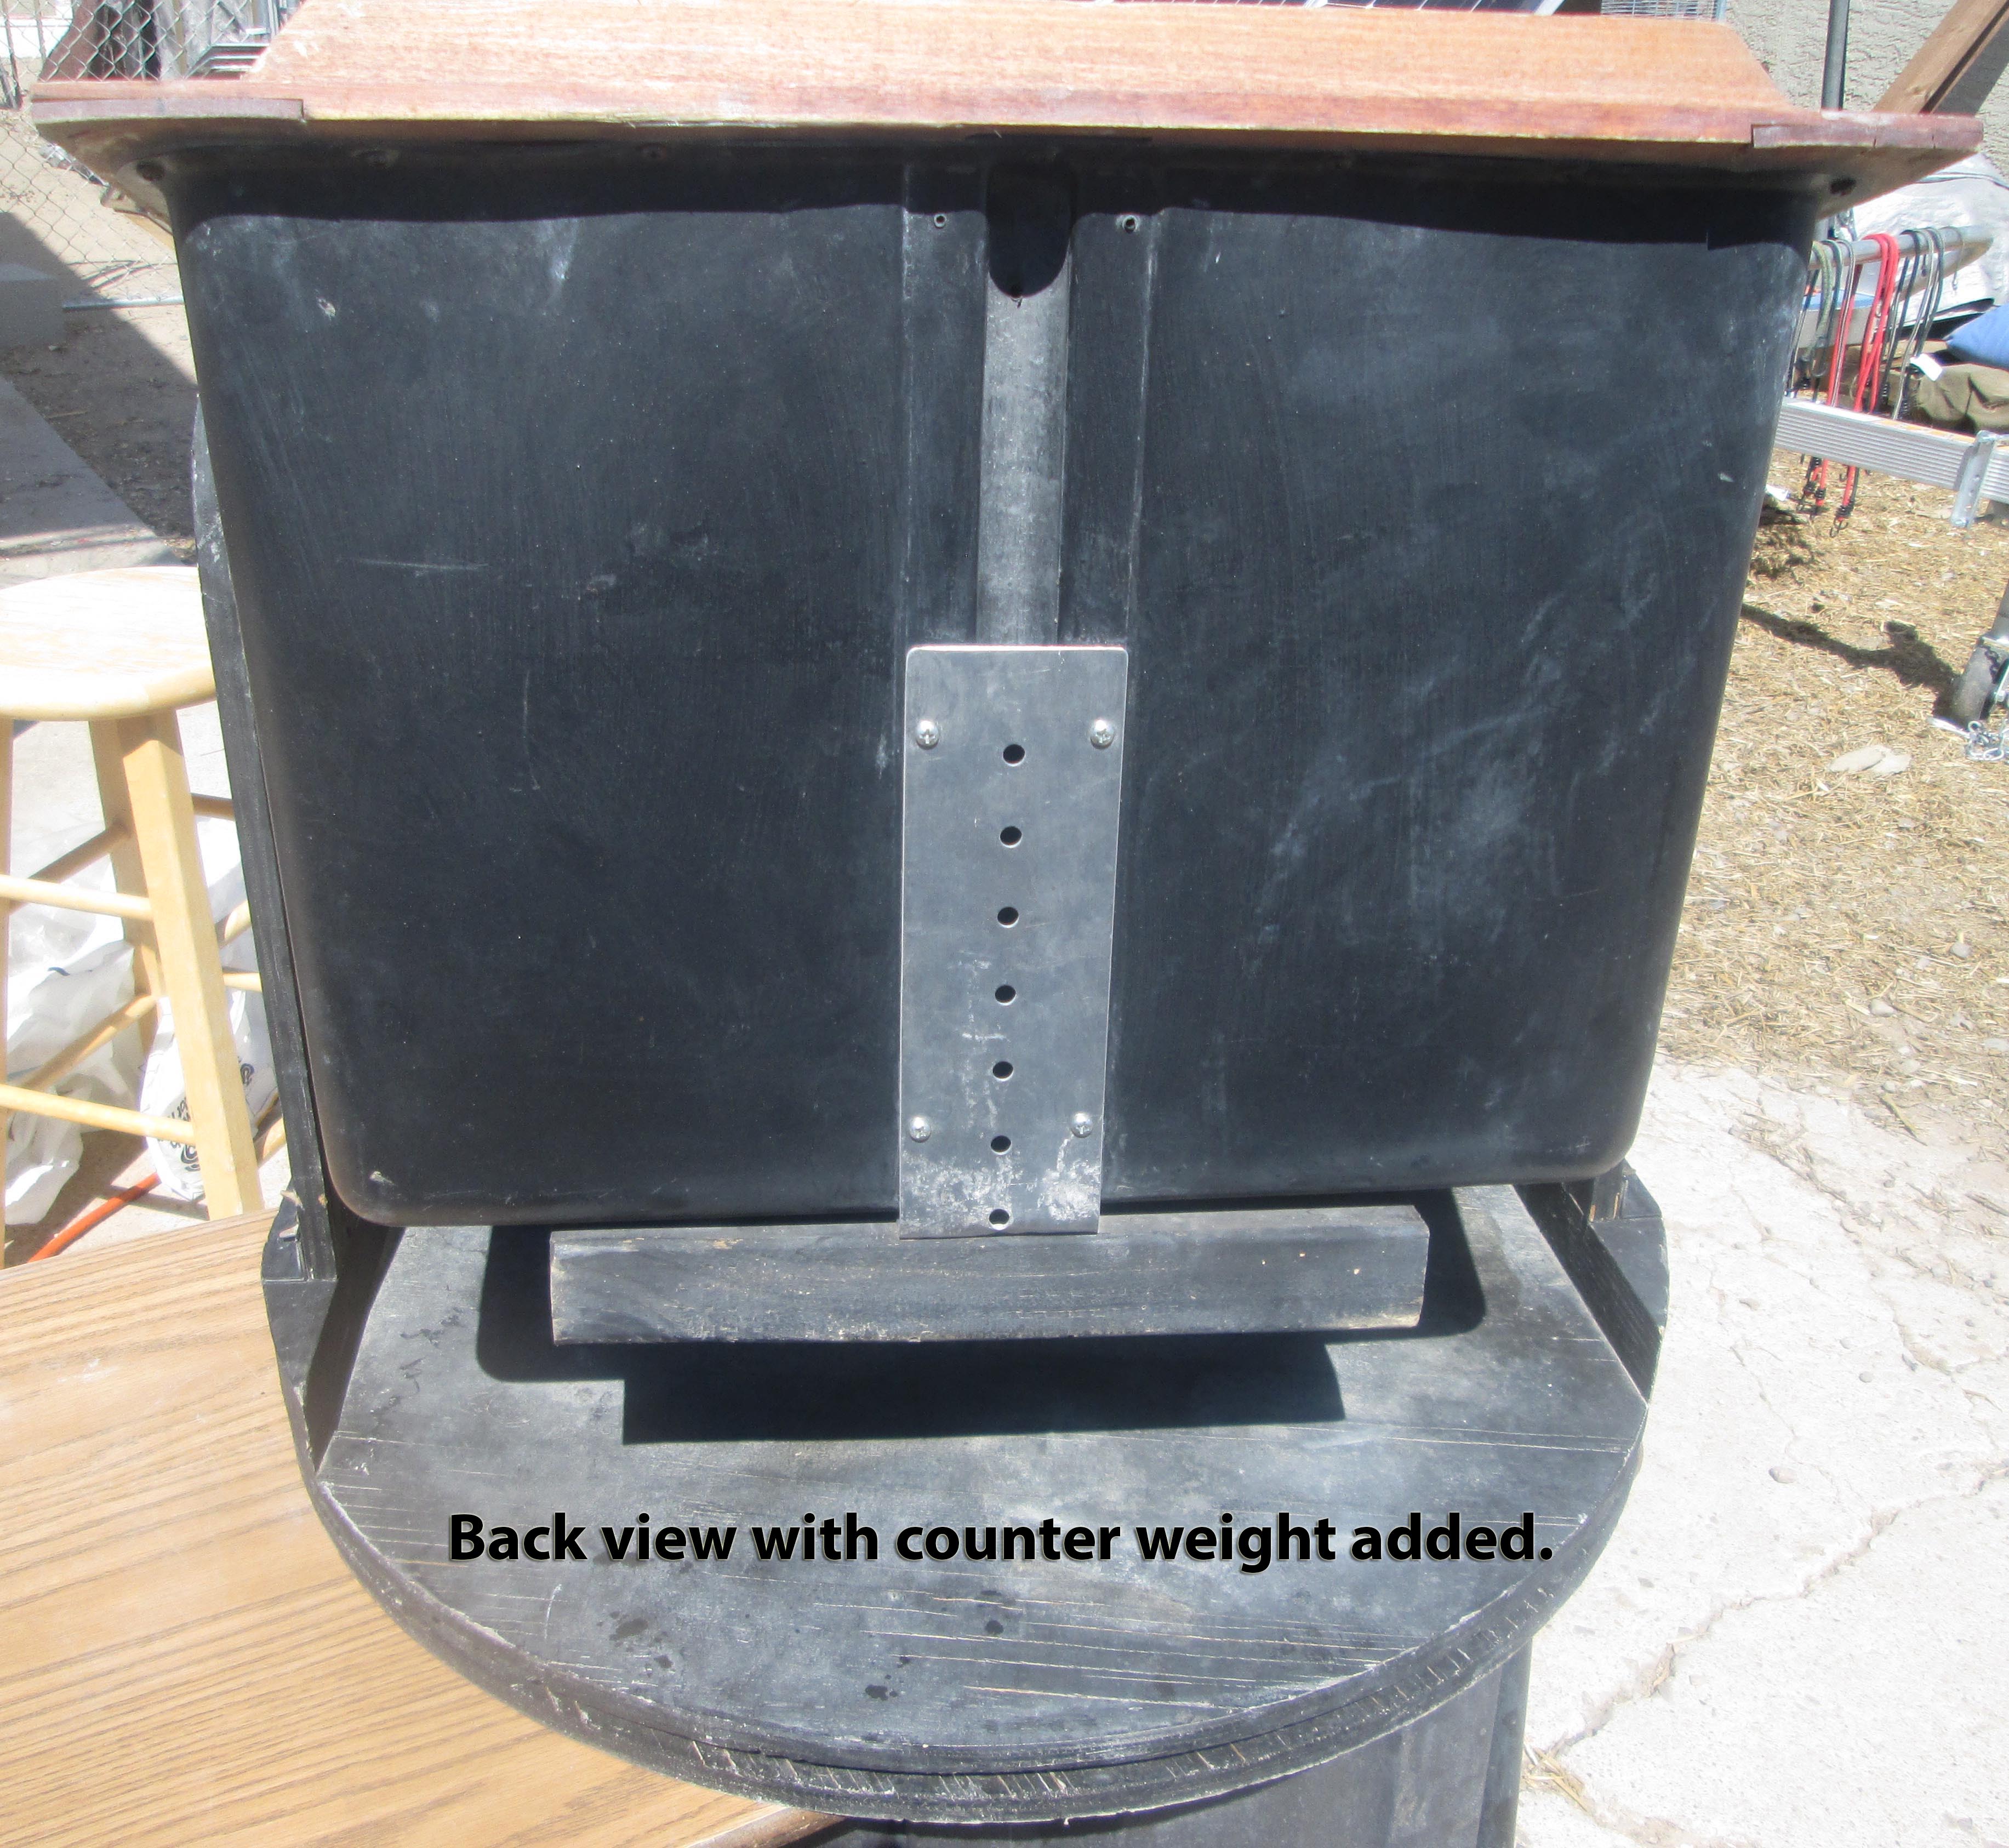
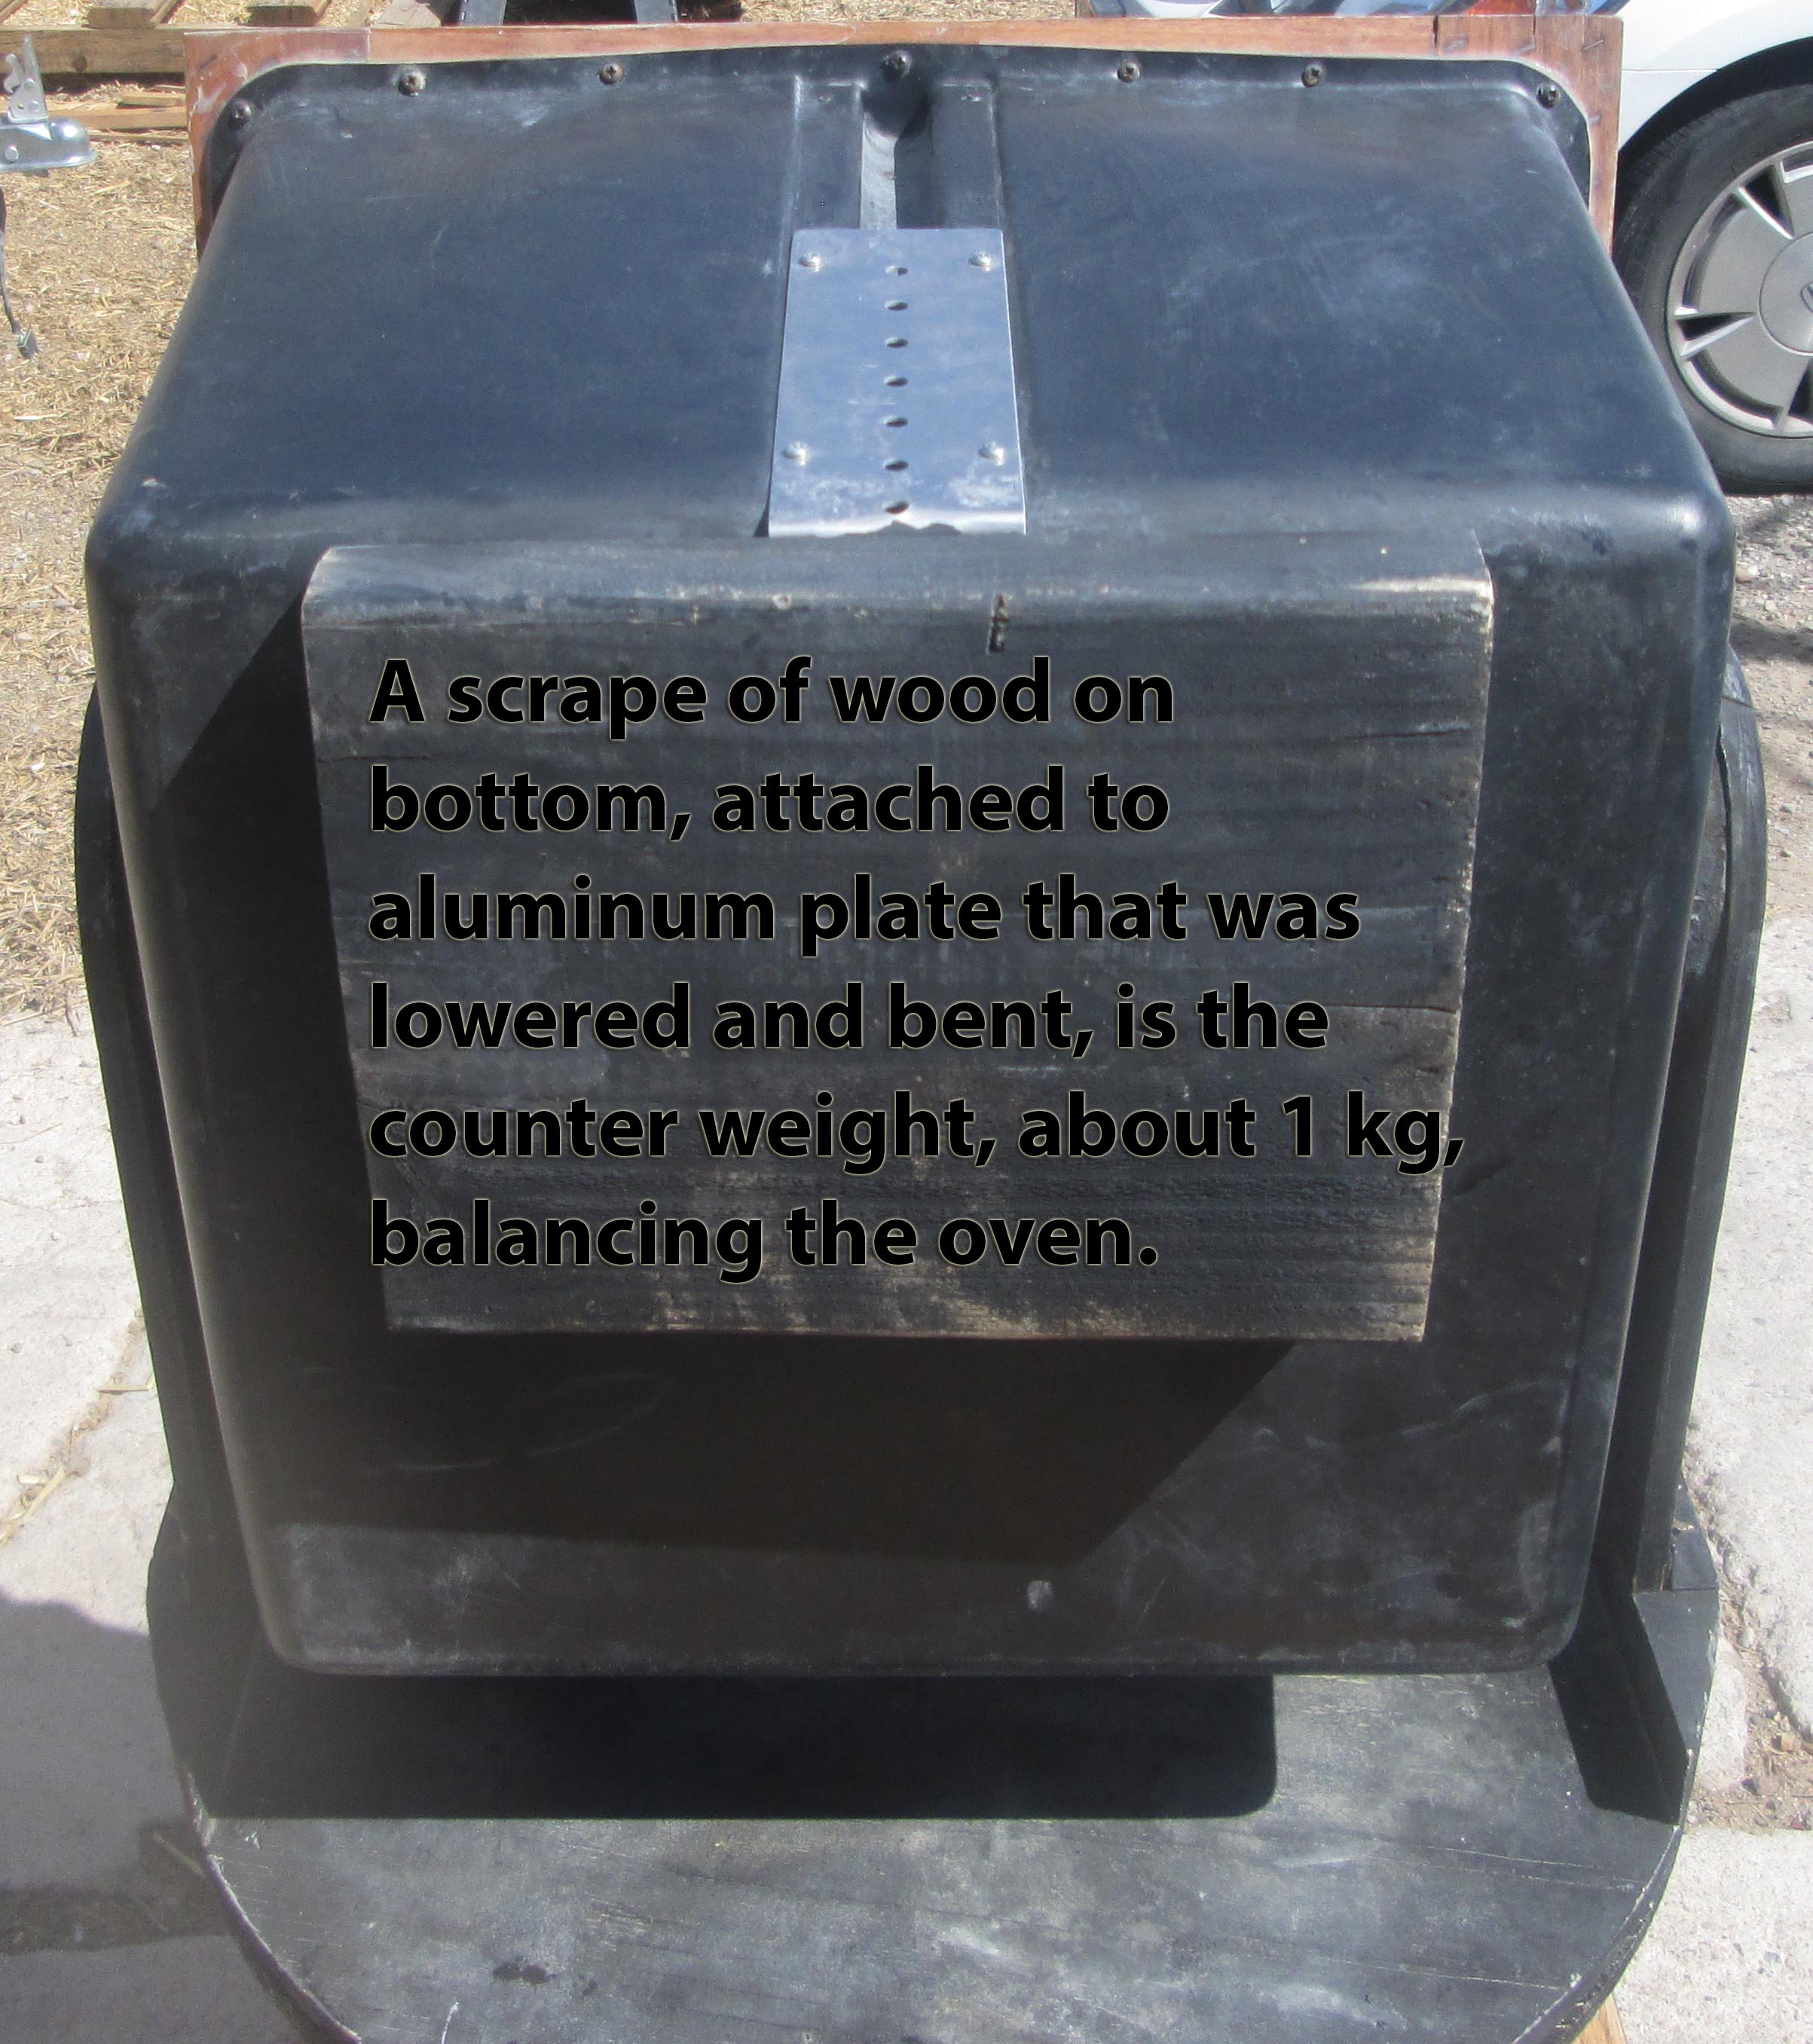

To reduce friction two pieces of stiff plastic or aluminum, such as from the bottom of disposable pie pans, go between oven and arms with grease between. The wingnuts can be tightened to increase friction just enough to not move in wind but allow tilting with a little push or pull to adjust. The arms detach at the bottom, and are not removed from the cooker, just loosened to remove.
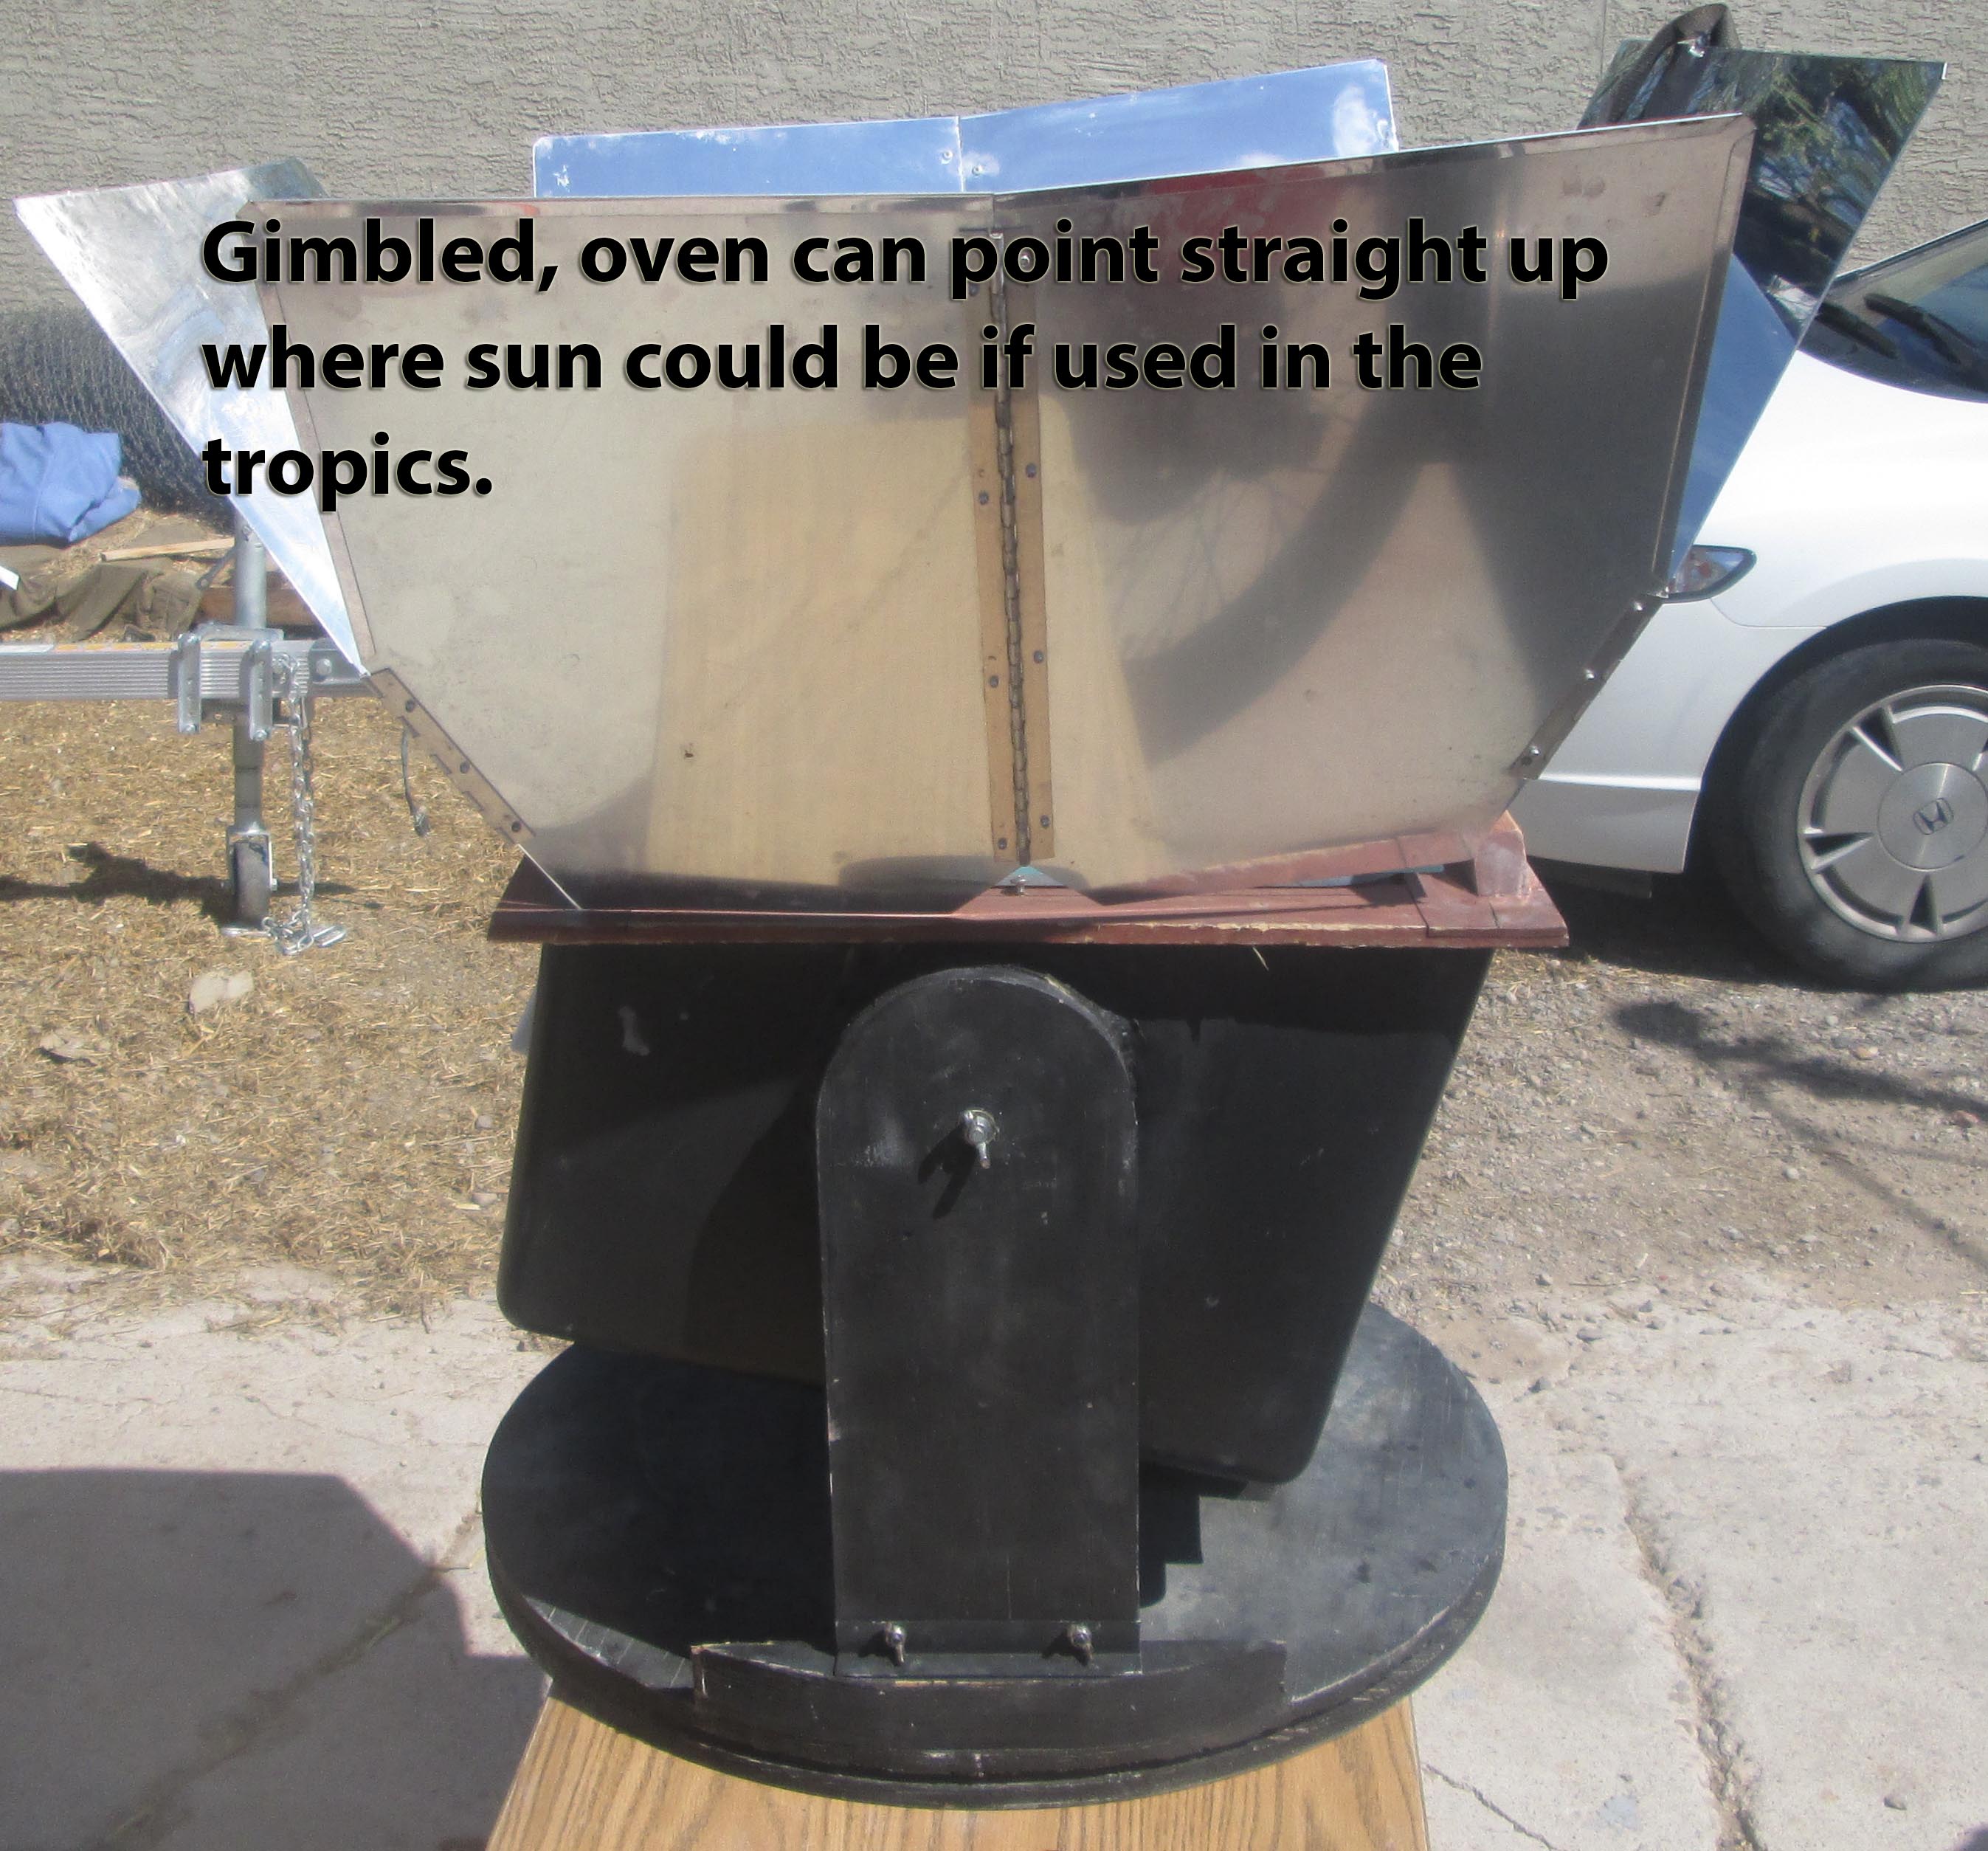
The gimble allows the reflectors to point straight up, as the sun may be in the tropics, and to follow the sun down or catch the first rays. Designing a solar slow cooker to not work in the tropics shows a temperate bias.
That's it to gimble the cooker such that a non-enthusiast will use it. Those who may not feel up to making one, likely know someone who, with a bit of inducement, could.
Adding Insulation
According to SUN OVEN® their slow cookers are “extremely well insulated.” They don't give an R value, but an informed estimate, given the insulation used and thickness, is about R 4. This is at best marginal as it is illegal to make and sell a travel trailer with less than R 7 insulation and those made for winter use are much better insulated. A so-called oven should be better insulated than a cheap trailer. The gimbled cooker can have 1 inch foam added. Cut five pieces and glue them on. To make it more durable, coat with fabric and elastomeric roof coating. You can use mesh made for this purpose or cut up an old sheet or some thing. Adding closed cell foam adds R 5 for R 9 which would allow you to call the cooker “well” insulated. To say it is “extremely well insulated", think R 50.
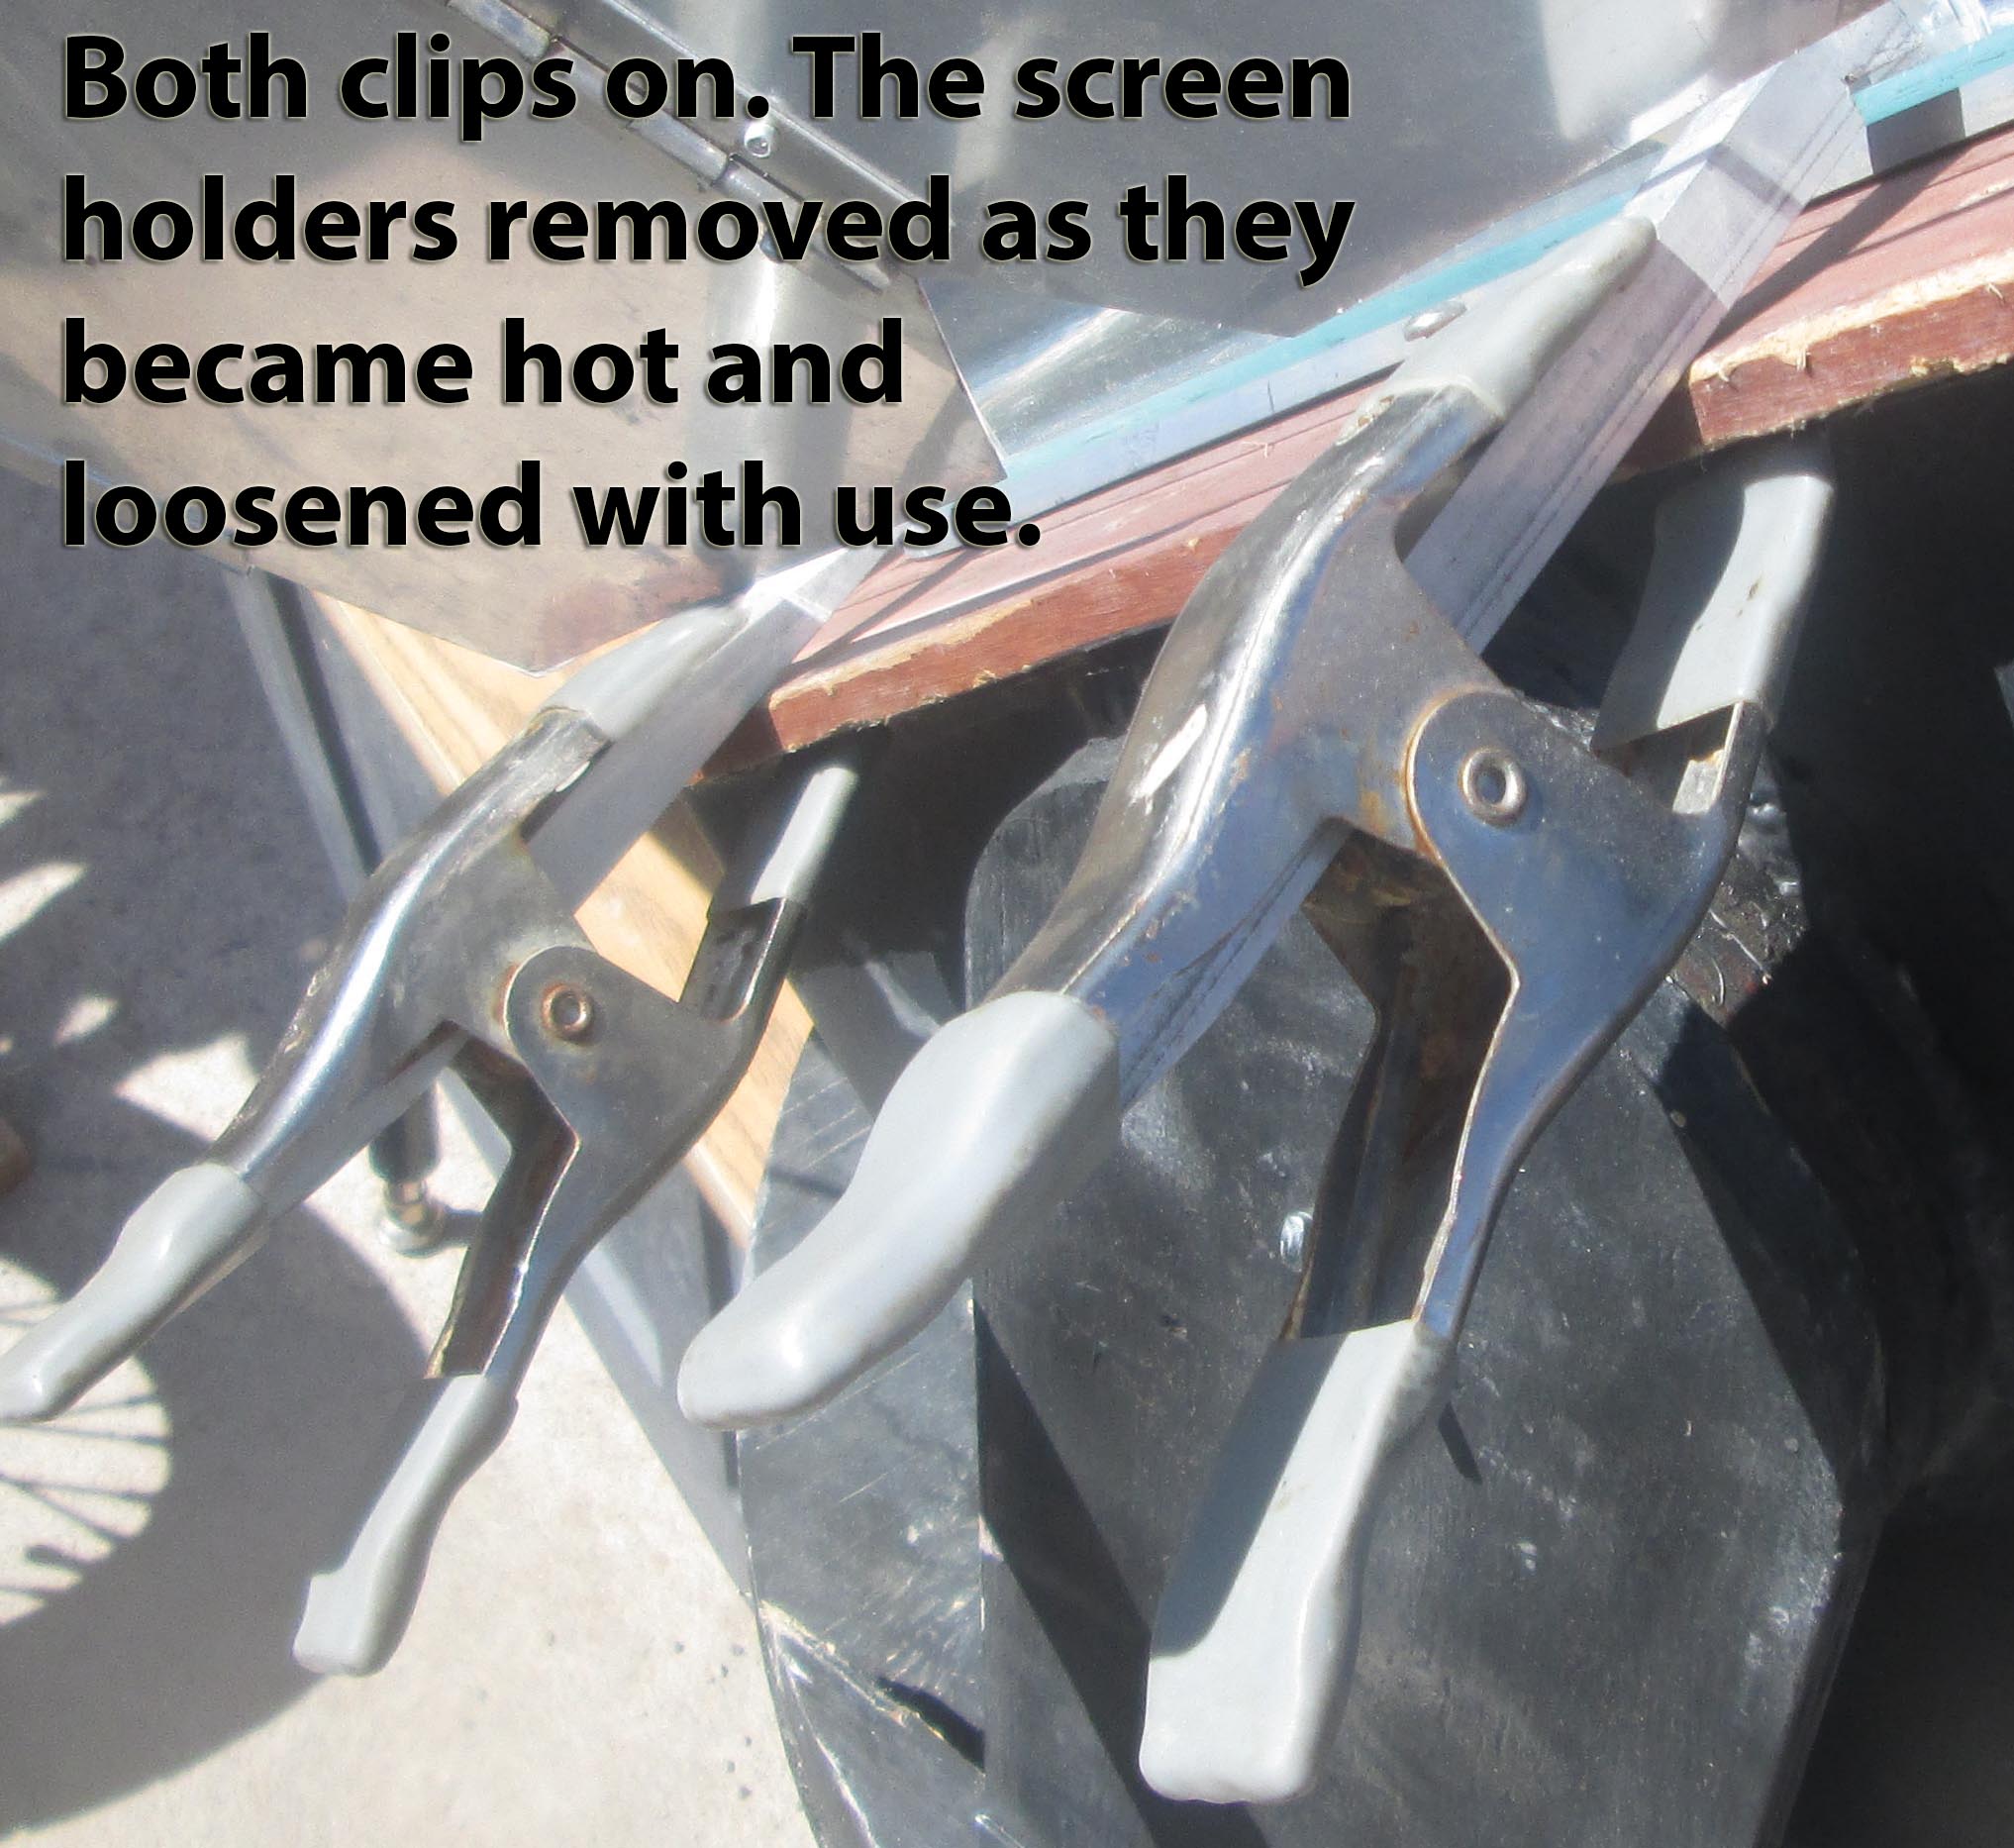
The real heat loss is not from the bottom and sides as much as through the single pane glass door. Double pane windows are not new, and most are just two pieces of glass with an air gap (air, not argon, though using an inert gas without any moisture in it is slightly better, but in a slow cooker a bit of condensate on the inside is nothing compared to what forms on the underside when cooking). The gap should be about ¾ inch, but less will work too, and strips of wood glued on will work. Cut or have cut a piece of glass to fit inside the opening and round the corners on a grinder or have the corners cut off. A small gap isn't to worry about. A piece of glass is cheap or free is you have scrapes and a glass cutter.
Note: no pictures because I'm using the SUN OVEN® to compare the functionality of other offerings to, and so I don't want to make it hotter or be functionally different in terms of temperature. When no longer testing, I'll add foam because doing so will be relatively easy. I know people with the same oven and can do a side by side comparison to measure the improvement. But doubling the insulation will help.
Drain or Bail
Another mod is to drill a small hole through the lower inside edge and glue a ¼ inch tube in to drain the water that condenses on the glass and runs downs during cooking. This saves having to bail the SUN OVEN® out after each use. If condensate is not pooling in bottom, it is seeping through and into insulation to mold, so if nothing else seal the rivet holes. Also drill a small hole through the back to allow a temperature probe to be inserted.
Reposition Reflector
The hinged edge of the reflectors are above the door and the opposite edge is below, so the reflector reflects somewhat ineffectively. It may reflect effectively enough, but if better designed it would work better and wouldn't cost any more to do it right. All of the light reflected should go through the glass, but much shines on the edge of the wood outside. Given the size of the reflector, it should be mounted higher up. Adding a raised lip around the door with tin foil on it would approximate how it should work.
Remove Dial Thermometer
 The dial thermometer the SUN OVEN® comes with is so inaccurate as to give a seriously false impression of how hot the oven temperature is. It also reflects light, mostly back out, so it detracts from functionality and when the glass is covered with condensate it can't be read anyway. To remove, twist it around and around several times until it breaks off. This is the easiest improvement to make.
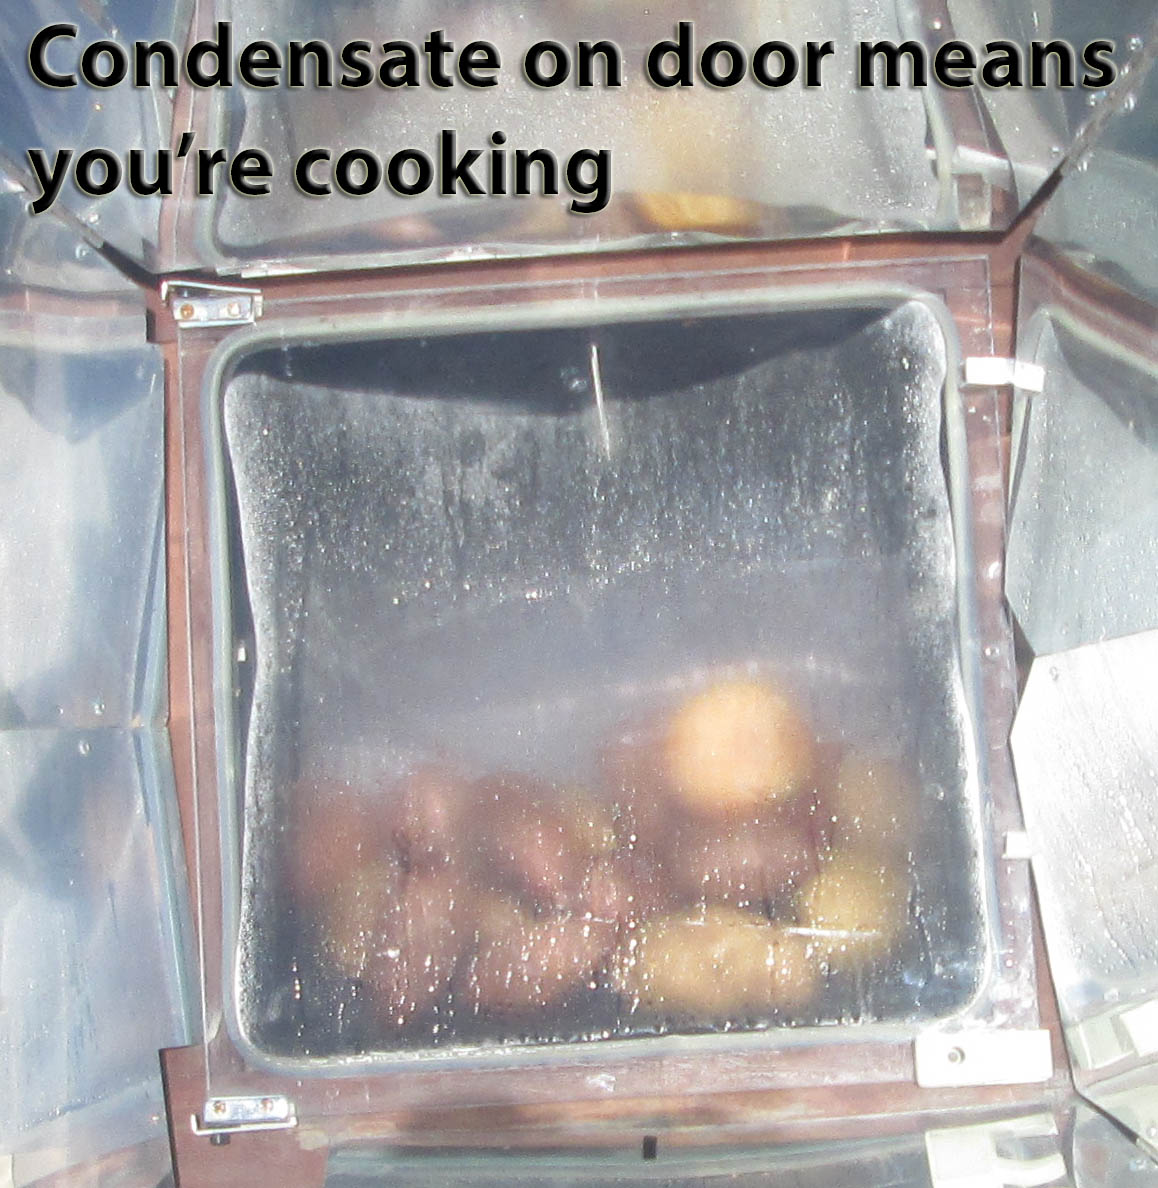
A thermometer is not needed. When condensate forms on the glass it is because moist food has reached boiling point. Moist foods will not get any hotter, just boil faster. Higher oven air temperature makes moist food (jerky doesn't need to be cooked) heat a bit faster and greasy food will cook faster, but moist foods merely dry out faster. If cooking a pot of beans, probably not an issue, but reducing moisture content is not always a good thing. So condensate means boiling has begun. Note time and remove accordingly.
The main difference between a solar slow cooker and a hot-point stove is the time needed to bring food, say a pot of beans, to a boil. The time needed to bring a pot to boiling point in a solar slow cooker, like the SUN OVEN®, can be 2 to 4 hours depending on amount of liquid and sunshine. Once boiling temperature is reached, as indicated by condensate on glass, remove when enough time has passed. Maybe 30 minutes for rice or 3 hours for beans.
Digital thermometers with probes, not specially made, will probably be reasonably accurate. Drill a small hole for probe. Best lower down where food will be. Probe can also be removed to measure actual food temperature, critical if cooking meat. The probe can be in food in oven, with console outside where it can be read (Digital Probe Cooking Thermometer
). Some folks are serious BBQers and use a dual probe Long Range Digital Wireless Thermometer that is just the thing for doing serious solar cooking.
The performance will not be dramatically improved even if all modifications are made. But higher temperatures, closer to the advertised ones, can actually be achieved so food will cook faster. If doing the above mods, you might as well do it right, do it all, and make your SUN OVEN® work the way it could. It takes a bit more money and a lot of time to get it done right, and the satisfaction isn't priceless, but if you have a SUN OVEN® and want to used it regularly, you might as well make using it less painful. Of course, real enthusiasts find solar cooking all good and love their unmodified practically perfect Mary Poppins like SUN OVEN®.
Note to SUN OVEN®: You may use any or all modifications and claim them as your own for a mere $57,000 donation. Notarized disclosure statements will be burned on receipt of money. But wait, such an offer makes me look like money-grubbing scum. So icksnay to that offer. Feel free to use any and all with your next product roll out: The Super All American Deliriously Fabulous SUN OVEN® that will sell for only $599 for the mere gifting of 57 SUN OVEN®s to me to give away to neighbors in mi barrio who couldn't possibly afford one. But include a bailing sponge or drain, and leave the oversized vinyl signage plastered on the sides off as I don't want to have to open all 57 boxes to remove them. Deal?
